Applications to Smooth Walls
Applying graphics to a flat, smooth, painted wall is easy. Still problems can and do occur. Rarely are these graphics failures the result of application technique. Instead improper surface preparation and poor material choices account for most problems. If you follow the few simple rules in this article, your applications should be trouble-free.
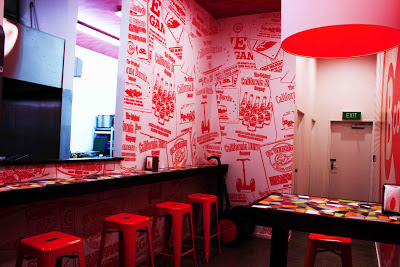
Auckland Signs in Australia wrapped the walls of the California Burrito restaurant chain with Arlon’s DPF 207 Digital Print Film, a 6-mil vinyl film with a removable adhesive. Photos courtesy of Arlon Graphics in Santa Ana, CA.
Always Conduct a Site Survey. Before jumping headlong into a project, thoroughly inspect the job site so you know what you are getting into. That way, if additional work is required, you have covered your costs. In conducting a survey, don’t forget to bring a tape measure, digital camera and notepad.
When inspecting walls in an older establishment, look for wall damage and the cleanliness of the walls. Holes, nail pops, peeling paint, cracks and imperfections in the taping of drywall along seams and in corners must be repaired, primed and painted. Unrepaired wall damage, such as gouges and nail pops may be visible after the graphics are applied, especially if a gloss overlaminate is used.
Walls stained from cigarette and cigar smoke or coated with grease from cooking require thorough cleaning. Walls painted with a matte finish latex paint must be cleaned and repainted with a semi-gloss or gloss paint.
When surveying a commercial jobsite, such as a restaurant or convenience store, also look for walls that back up to cooling systems, water pipes and overhead windows. These areas are prone to condensation, which can contribute to edge lifting and adhesion failure.
In addition to photographing any problem areas, also take pictures of any obstructions, that you will have to deal with in the application, such as windows, cooler cases, display cases and shelving units.
If the walls are currently decorated with wall graphics, and the graphics are failing, photograph these failures. These pictures can come in handy when you make your sales presentation.
New construction. Graphics applied to newly constructed and painted walls can have problems too. Before priming and painting, the drywall mud must be thoroughly dry. Any trapped moisture in the drywall can result in paint problems, such as peeling, cracking and blistering. And when the paint doesn’t stick, neither will the wall graphics.
Painting Recommendations. After drywall is sanded, wipe the wall down with a lint-free rag, dampened with 50% Isopropyl Alcohol and 50% water. Painting over a dusty wall can prevent the primer from bonding well to the wall surface.
New drywall must be primed before painting. There are no exceptions to this rule. Primers are essential for good paint adhesion, especially if you are painting with a latex paint.
In selecting a primer and paint, make sure that both are compatible. The general rule of thumb is that you can use either a latex or oil-based primer with a latex paint; but you must use an oil-based primer with an oil-based paint.
Many painters prefer oil/alkyd primers because they penetrate the drywall surface better, providing better anchorage of the paint. Oil/alkyd primers also form a moisture barrier, which helps prevent moisture from getting behind the applied vinyl, degrading the adhesive and causing the graphics to peel. The disadvantages of oil/alkyd primers are that they take longer to dry and that they emit Volatile Organic Compounds. VOCs in oil-based paints are said to contribute 9% to the air pollution that forms smog.
By comparison, latex primers and paints are very low in VOCs. For either indoor or outdoor work, whether you are priming drywall, bare wood or masonry walls, Prep & Prime® Gripper® water-based primer sealer #3210 form ICI Paints is a good choice. It not only dries fast, bonds to “tough-to-stick-to” surfaces, but it also covers stains well. Right out of the can, without thinning, this primer provides good coverage in one pass.
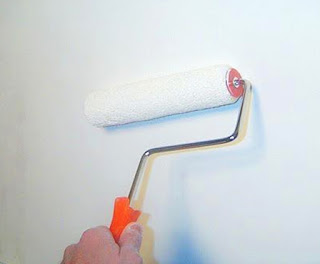
After drying for 72 hours, apply two coats of either a satin, semi-gloss or gloss paint. Matte finish paints are not recommended, because the matting agents used in the paint can prevent good vinyl adhesion. To reduce any stippling effect in the paint, use a paint roller with a 3/8” nap. Avoid any heavily tinted paints, which require longer drying times to leach or outgas.
After painting, wait at least five days before applying wall graphics. How long the paint will take to outgas and fully cure depends on many factors, such as ambient temperature and humidity. If the paint is not fully cured, don’t be surprised if bubbles form underneath the vinyl.
Also read:
Preventing Wall Graphics Failures
Priming and Painting for Wall Graphics Application…
Surface Preparation. Even newly painted drywall must be wiped down before vinyl application. Dust and other contaminants collect quickly on a wall and can prevent good adhesion of the graphics panels. In cleaning, wipe the surface down with a rag dampened with 50% Isopropyl Alcohol and 50% water. After wiping down the wall, wait a half an hour for the wall to dry thoroughly before applying graphics.
Older walls contaminated with years of dirt, smoke and grease must be washed with trisodium phosphate (TSP). (TSP is a very caustic cleaner. Before using carefully read the directions and the safety precautions and wear safety glasses and rubber gloves.)
Typically, about ¼ cup of TSP is mixed into a gallon of very warm water. Using a sponge, apply the cleaner to the wall surface. Drench a sponge in clean water, wringing it out until it is just damp. Wipe the dirt and grime from the wall. Finish the job, rinsing with a wet sponge.
Material Selection. There are a variety of choices for decorating smooth painted drywall. Heavier calendered vinyl with a removable adhesive is generally easier to install and these thicker films can hide imperfections on the wall surface.
Printed graphics should be protected with an overlaminate. The extra layer of film not only protects the printed image, but it also makes the graphic more rigid, so it is easier to handle during installation. When it comes time for new graphics, the extra thickness also aids removal.
In selecting the surface finish of the overlaminate, take into consideration the lighting conditions in the room. Painted drywall will always have slight imperfections that can show up if you use a glossy overlaminate. In many well-lit retail environments, the best choice is a satin or matte finish, which will mute any reflections from overhead lighting.
Printing Considerations. Before going into a production run, you should test and evaluate any vinyl film, overlaminate and application tape that you plan to use. To prevent any adverse ink/vinyl reactions, you should limit your ink density below 250% to 275%. Also avoid printing a bleed (printing edge-to-edge), if you can.
After printing the panels, match the sheets. It is much better to catch any printing mistakes in the shop than out on the job site. Check for any color shift and make sure that the points of alignment match up.
Allow the printed panels to fully cure before laminating and installing the graphics. If printed panels are rolled, roll them loosely to allow solvents to fully outgas during the drying period.
To prevent scratching of the graphics during application and aid the installation of the printed panels, use a low tack application tape, such as RTape 4000. If you are applying plotter cut letters to wall surfaces, you will need a higher tack application tape, such as RTape 4078RLA. This new tape will transfer difficult-to-transfer films utilizing release liners with a tight release. After the graphics are applied, the application tape releases easily from applied graphics without pulling the graphics off of the wall surface.

Ritrama’s Ultimate Wall Action print media (shown in the photo above) allows you to print to the edge. No border is needed to prevent edge peel. there is no need to leave a border when printing anymore! Our Ultimate Wall Action, The 5.0-mil semi-rigid film features an ultra low peel microsphere removable adhesive for short-term applications.
Application Tips. Now comes the easy part – the installation of the graphics. The first step in any graphics application is to lay out the job. Unroll all of the panels and tape the graphics in place to make sure that all of the panels needed are there and that everything fits.
To ensure that you keep all of the panels level, stretch a level line that you can align the top of the graphics sheets to. Never apply graphics over a snapped chalk line because the chalk dust can contaminate the adhesive.
Never, under any circumstances, should you use an application fluid to apply wall graphics. DRY APPLICATION ONLY.
To aid application, remove about eight inches of the release liner from the top of the graphics panel. Crease the liner with your thumb, exposing the adhesive of the vinyl. After tacking the panel in place, start your stroke in the center of the graphic and squeegee horizontally from side to side. As you are performing the application, remove the release liner as needed, exposing the adhesive of the vinyl graphics.
After applying the graphics, remove the application paper, pulling the tape at a 180⁰ angle against itself. Then, resqueegee the entire marking – especially the edges – to ensure good adhesion.
After completing the application, the last steps are to inspect your work, pick up your mess and look for new graphics opportunities, such as window graphics or vehicle wraps.


