
If you have a solvent, ecosolvent or latex inkjet printer, you can decorate t-shirts, jackets and jerseys with colorful graphics and corporate logos using RTape Tatoo™, printable polyurethane heat transfer films. Selling printed appliques to your existing customer base is a great way to increase your shop’s sales at high profit margins without a lot of effort. The manufacturing process is not very complicated, so there is not much to learn. And the only additional equipment that you will need for your shop is a heat press. (If you don’t own a heat press, you should read my story: Shopping for a Heat Press.)
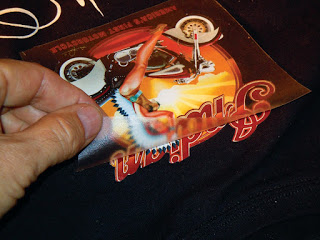
The Indian Motorcycle applique was printed with an HP latex inkjet printer.
Tatoo™ films are our most popular printable heat press films. While the Tatoo™ brand is comprised of several different products, the basic construction for all of these films is the same. Tatoo™ consists of a printable white film coated with a heat-activated adhesive on a clear polyester carrier. This product construction is very similar to printable pressure-sensitive vinyl media. The adhesives are different. And Tatoo™ uses a clear film carrier not a siliconized paper release liner.
Printable Polyurethane versus Vinyl:
After you design your graphics, always perform a test cut prior to production. Tatoo™ films are very easy to cut and weed. You will probably need to make a few minor adjustments, such as downforce pressure and cutting speed. For more information on plotter cutting polyurethane heat transfer films, read the article:
Printing tips: When digitally printing Tatoo heat transfer polyurethane films, a generic ‘heat transfer media’ profile will generally provide acceptable color reproduction. Make sure that you print on the polyurethane film and not on the polyester carrier. Both sides of the film are very similar in appearance. The polyurethane side of the films has a matte finish. The carrier has a smoother finish. If you are still confused which side is which, scrape a corner of the film with an Xacto® blade. The white polyurethane film is very thin and stretchable. The thicker polyester carrier is clear and will not stretch at all. Also when you are printing on the film, print “right reading”.
Some ink systems take a while to dry completely. While a print may feel dry to the touch, any ink may take can take an additional ten minutes to a half hour to fully outgas. If the ink does not cure completely, the masking used to transfer the applique may not stick sufficiently.
To mask the printed Tatoo films, we have developed a high tack transfer tape called HM375 HotMask™. Before masking a printed applique, remember to allow thirty minutes for the print to dry.This waiting period is important, especially with ecosolvent inks, which can take a while to cure. Then lightly squeegee the masking over the top of the printed graphic to removing the large air bubbles. Many people find it easier to begin squeegeeing the masking from the center and working their way outwards. After the masking is initially secured, resqueegee the masking with firm pressure. Place the masked graphic to the side and allow the adhesion to build for fifteen to thirty minutes.
In most cases, you will print several appliques on the same sheet. After the printed graphic is masked, you can cut the sheet apart to separate the individual appliques. You can leave the masking on the graphic in storage until you are ready to apply the appliques to garment. After the adhesive builds to the optimal adhesion, it will not continue to build.
Time, Temperature and Pressure: Heating pressing appliques is not rocket science. It does, however, require than you read the instructions provided by the manufacturer of the heat transfer material. Products from different manufacturers or different product series from the same manufacturer will heat press at different temperatures for different amounts of time at different pressure settings. I also recommend that you read my story Pressing Heat Transfer Films.
The Tatoo printable polyurethane films are available in four versions: Tatoo, Tatoo Nylon for nylon and coated fabrics, Tatoo SubliBlock with an anti-migration layer, and Tatoo Pearl, which is a beautiful pearlescent white. Tatoo and Tatoo Pearl heat press at 330°F (165°C) for 17 seconds at medium to high pressure. Tatoo Nylon heat presses at 240°F (115°C) for 15 seconds at medium to high pressure. Tatoo SubliBlock heat presses at 240°F (115°C) for 17 seconds at medium to high pressure.

Every product is different. Read the manufacturer’s instructions before heat pressing appliques. Set the controls on the heat to the recommended settings.
Transferring Printed Heat Transfer Films: To transfer the printed graphic from the carrier, turn the masked applique over so the carrier is on the top. Then remove the carrier from the graphic, rather than trying to lift the graphic off of the carrier with the masking.
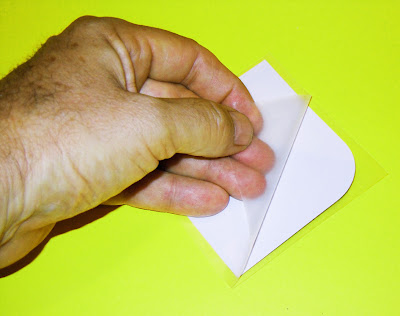
Remove the carrier from the graphic, rather than trying to lift the graphic off of the carrier with the masking.
Removal of the HotMask™ : After heat pressing, remove the graphic from the heat press and wait three to five seconds before removing the masking. With a warm removal, HotMask™ should come off cleanly and easily with no adhesive residue. The masking will also remove in a cold peel, but it removes easier warm. Whether you remove the masking warm or cold, it removes in one piece, not in little bits and pieces, so you can use it over and over again. I have used it as many as six times.
HotMask™ removes easily in a warm peel. It can also be removed cold.
As seen on hingstssignpost.blogspot.com


