 Application of graphics to vinyl banner material requires slightly different surface preparation and application techniques than other applications. What follows is a compilation of some suggestions to make your job easier.
Secure the Banner. Before applying pressure-sensitivevinyl graphics, tape or secure the banner to your work table surface using good quality, two-inch masking tape or by using clamps. Keeping the banner substrate taut (removing any slack) during the vinyl application will prevent wrinkles in the applied graphic.
Substrate Preparation. While new banner material right out of the box may look clean, chances are that the surface is contaminated with plasticizer oil. Handling the banner with your grubby paws can also leave skin oils on the fabric surface. These contaminants require that the surface of the banner material be prepared properly. Failure to clean the surface can cause adhesion failure and tunneling.
While some in the industry will recommend cleaning the banner substrate with a non-abrasive soap and water combination, soap residue could potentially contaminate the surface and adversely affect adhesion. Grease and wax removers can also leave an oily residue that can contaminate adhesives.
The preferred way to clean a banner is to wipe the surface down with either isopropyl alcohol or denatured alcohol. The alcohol wipe will remove any plasticizer on the banner’s surface. Using paper towels, dry the banner surface before application of the vinyl. Taking these steps in prepping banners eliminates any plasticizer and other contaminants that could affect the adhesion of the vinyl to the banner.
Never Use Strong Solvents. Whatever you do, don’t use any cleaner stronger that IPA. A variety of banner failures can be linked to using chemicals that are not recommended by the manufacturers, including the so-called mild solvents.
Strong solvents, such as lacquer thinner and acetone, can cause problems for a variety of reasons. Some solvents can melt the PVC and be absorbed into the banner material, only later to come out and attack the adhesive of the vinyl. These solvents can also draw out plasticizer from the banner, which creates exactly the opposite effect to what you are attempting to do by cleaning.
Plasticizer Problems. PVC banners have plasticizer to make the material supple and soft. Plasticizer migration has always been a problem. Manufacturers of banner substrate try to formulate the PVC so that the plasticizer is fused in the material and does not migrate to the surface. Plasticizer can soften the adhesive of vinyl films and inhibit adhesion. The problem of plasticizer migration can be accelerated when banner material, whether it is decorated or not, is stored at elevated temperatures over a long period of time. The safest practice is to evaluate older vinyl banners, before applying vinyl graphics or printing.
Awning materials, which are similar to banners, are even more heavily plasticized. Plasticizer can soften an adhesive allowing a film to slip on the surface of the substrate, creating very tiny tunnels that form in the vinyl, called worm tracks.
Job Lay Out. In laying out your job, draw lines on the surface with a Stabilo or Staedler marking pencil. Both brands of pencils come in a variety of colors, such as white, blue.
Hinging Technique. To make vinyl applications to banners easier, try using a hinging technique, such as a side hinge. In creating a hinge, tape one side of the graphic to the banner or work surface. Reach under the graphic and remove a portion of the release liner to expose as much adhesive as you feel comfortable in working with.
Wet Applications. In most cases, you should apply graphics to banner material dry. If you must apply the vinyl wet, use a commercial grade application fluid such as ActionTac, Splash or RapidTac, rather than using a homemade concoction. Use the least amount of fluid to accomplish the job.
Medium Tack Application Tape. For banner applications, I prefer using a medium tack application tape, such as RTape’s 4050RLA. High tack application tape, which is the most commonly used tack level, is too tacky. Because these tackier tapes adhere well to vinyl banner substrates, they require extra effort to remove them following graphics application. In some sign shops removing an overly aggressive application tape becomes a tug-o-war. It is always best to use the lowest tack tape to accomplish any vinyl application. When applying graphics to banners lower tack tapes are the best choice because they are much easier to remove following the application.
Heavyweight Application Tapes. To aid your applications consider using the thicker premium grade tapes, such as RTape’s 4760. Heavyweight premium tapes have a number of advantages. They are easier to laminate to vinyl graphics, so you get fewer wrinkles and bubbles in your tape. The heavier tapes give more body to vinyl films, which makes graphics installation easier. And when you have finished applying the vinyl to the banner, the heavy tapes are stronger so you are less likely to tear during tape removal than lighter standard weight paper tapes. That saves application time and prevents installation headaches.
Vertical Applications. If you are applying graphics to a very large banner, you may consider taping banner to a wall or another vertical surface. This way you won’t need to fight gravity as it pulls the graphic to the substrate. Working on a vertical surface also reduces the distance that you have to reach, since you won’t have to stretch across the entire banner for one side of your worktable.
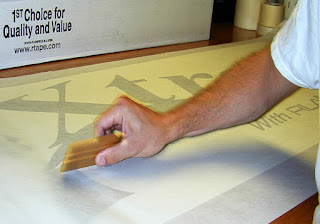
Resqueegee Applied Graphics. Whether you are applying the graphics wet or dry, always use a hard nylon squeegee and good squeegee pressure to ensure that the adhesive flows out onto the banner surface. Remember, they call vinyl a pressure sensitive, which means that you need to apply pressure to make it stick. After removing the application tape, resqueegee the entire graphic to prevent edge lifting.
Heat Improves Adhesion. After applying vinyl to the banner material with a squeegee and removing the application tape, heat the applied graphics with a heat gun and burnish the film with a rivet brush. The heat softens the adhesive on the vinyl, causing it to flow out onto the texture of the banners surface. The heat also softens the vinyl graphics, making the vinyl facestock more pliable so that it conforms to the banner substrate. Using heat in the installation process aids the ultimate adhesion of the film and helps prevent edge lifting and adhesive delamination. After installing vinyl graphics, you should let the banner lay flat for at least a day to let the adhesion of the vinyl graphics build.
Educate Your Customers. When your customers pick up their banner, take the time to instruct them in how to hang the banner, how to properly roll and store the banner and how to clean the banner. As a sign maker you are responsible for manufacturing the banner in a professional manner. As customers, they are responsible for properly caring for the banner. By taking the time to educate your customer, you will minimize the problems that result in dissatisfied customers.


