Staining and varnishing is a great way to finish an interior sign, if the wood used has a beautiful natural grain, such as mahogany. Stains contain pigments that tint and accentuate the grain of the wood.

To create the directory sign pictured above, Dr. Francis Lestingi hand carved a mahogany panel. To enhance the beautiful rich color of the wood, he used a mahogany stain. The sign is protected with four coats of spar varnish. Photo courtesy of Signs of Gold, Buffalo, NY.
Staining and varnishing usually will not provide long lasting protection for outdoor signs, which are subjected to the bleaching rays of the sun and blistering heat. For exterior applications, most wood surfaces should be painted, if you expect to achieve long-term durability.
In the real world it’s hard not to give the customer what he wants. If it’s varnish that the customer wants…you know how it goes. Using the right products, you can achieve acceptable results outdoors with varnish. After all, marine spar varnish has been used for years to protect woodwork on yachts.
Varieties of Varnishes. Varnishes of an oil or water vehicle (also referred to as the carrier) and some type of resin, both of which contribute to the physical properties of the varnish. Some of the better known resins are alkyds, phenolics and polyurethanes.

Is crime on the rise in Buffalo? Their 10 Most Wanted List has been expanded to accommodate 15 “Wanted” posters. This stained and varnished mahogany sign is decorated with carvings gilded with 23.75 karat gold. Photo courtesy of Dr. Francis Lestingi, Signs of Gold, Buffalo, NY.
Varnishes come in many varieties. Some are oil based. Others are water based. In the case of oil-based varnishes, the ratio of oils to resin significantly affects the performance characteristics of the varnish. Painters commonly classify oil based varnishes as long oil varnishes, medium oil varnishes and short oil varnishes.
The long oil varnishes contain a high ratio of oil to resin. The long oil types are also called “Marine” or “Spar” varnishes. The short oil varnishes, on the other hand, have a much lower ratio. It’s the oil that makes the varnish flexible and less likely to crack. That’s why the long oil finishes are much more durable for exterior applications, because they expand and contact as the wood expands and contracts.
Surface Protection. In the sign industry, sign makers often choose polyurethane varnishes or spar varnishes to protect the wood from potential damage. In general, varnishes provide good protection against solvent spillage, moisture, abrasion and the degrading effects of high summertime temperatures.
 The sign above combines a painted pictorial and copy with a stained and varnished wood background. Painted with Ronan Aquacote, then varnished with Minwax® Polycrylic® water-based varnish. Photo courtesy of Butch “Superfrog” Anton of Two Brothers Signs, Detroit Lakes, MN.
In some cases, spar varnishes are selected for outdoor applications, because their flexibility allows them to move as the substrate expands and contacts with the fluctuations in temperature throughout the year.
Although some polyurethane finishes contain UV inhibitors in their formulation, exterior durability is nevertheless limited. Many polyurethane finishes contain a lower concentration of oil and are consequently more brittle and are more prone to crack.
Like everything else, oil based varnishes have their advantages and disadvantages. On the plus side, they provide good protection for indoor applications. They are also easy to apply. Because varnishes cure at a slow rate, they have time to level out allowing brush marks to disappear. On the other hand, the extended open time can also be a big disadvantage. Polyurethanes can take as long as 24 hours to dry. If you apply multiple coats of varnish, production time can extend to several days.
If you decide to use a polyurethane varnish, many of the pros recommend a conventional one. These conventional solvent-based varnishes are tougher, more durable and clearer than the water-based products.
Some water-based varnishes are nothing more than latex paint without the pigment. While they typically won’t yellow as oil-based products will, in the opinion of some sign makers, they look very plastic. The water-based products also can raise the grain of the wood and the humidity and temperature in your shop will affect drying to a great degree.
Compared to a standard polyurethane varnish, water-based polyurethanes are significantly lower in VOCs. Nevertheless, under pressure from governmental requirements and environmental activists, manufacturers of conventional varnishes in general have cleaned up their act. With the use of synthetic resins, many of the oil based varnishes manufactured today feature improved outdoor durability. Toxic materials, such as lead, have been replaced with safer ingredients.
SAFETY FIRST. Before varnishing, always read and heed the safety guidelines in the MSDS bulletins, paint manufacturer’s technical data sheets and product labeling. At the beginning of every work day, take ten minutes to review these safety precautions with your employees.
As varnish dries, solvents evaporate from the coating. Your shop environment can become heavily laden with solvent fumes. This can pose a potential health hazard to you and your employees. In addition, as the solvent fumes fill the air, the amount of oxygen becomes depleted, and consequently slows the evaporation process. Good shop ventilation can prevent build-up of solvent fumes. If you use a fan for air circulation, make sure that the draft does not cross the varnished surface. Good exchange of air will accelerate drying times.
Safely dispose of your rags in a metal contain with a secure lid. This will prevent fires resulting from spontaneous combustion.
Sanding. Proper prior surface preparation will minimize problems and contribute to success in finishing.
- Sand with the grain using long strokes.
- Always use a sanding block. A block will distribute the sanding pressure evenly, so the surface of the substrate will be even.
- Padded sanding blocks are generally recommended because they have a little give that prevents creation of scratches.
- Regularly clean off the debris from the surface being sanded. Particles between the wood and sandpaper can cause scratches in the wood. Use a brush or vacuum for cleaning. Then, wipe away remaining dust with a tack cloth.
- Use light pressure when sanding. Excessive pressure can scratch the wood.
- Change the sandpaper frequently as soon as it clogs up.
- When hand sanding wood sign blanks, start with a coarser grade of sandpaper and work through the grits to a finer grade of paper. If the wood surface is especially rough, start sanding with coarse 80 grit sandpaper. Then follow up with a medium 100 to 120 grit paper. Before painting, finish sanding with fine 150 to 180 grit paper. Between coats, sand with a very fine 220 to 240 grit paper, which will rough up the coated surface to promote intercoat adhesion.
- The process of staining can cause the grain of the wood to raise. The raised grain will give you a slight texture. This may be the look that you are looking for. If the raised grain is undesirable, there’s a way to minimize or eliminate it. Before sanding, soak a sponge in water and wring it out lightly. Wipe the entire surface, making sure that you wet the wood evenly. This ensures that the grain of the wood raises uniformly. After the wood dries, the grain will remain raised. To complete your project, begin sanding the dried wood with 120-grit sandpaper, first, and then with 220-grit paper. After sanding, sweep off the dust with a dust mop. Then wipe the surface with a tack rag.
Staining. Select a stain that enhances the natural beauty of the wood’s coloring and grain. While you can brush on a stain, many sign makers prefer applying it with a rag or cheesecloth.
While staining and varnishing can bring out the beauty of wood and give character to a bland one, the end results can vary. Some woods, such as pine and basswood, often do not accept stain evenly and can look blotchy. What causes the blotchy appearance is that the stain will soak into one part of the wood more than another.
Applying a wood conditioner prior to staining can prevent this from occurring. Here’s how it works. The pine or other soft wood will absorb the wood conditioner until it can’t absorb any more. That way, when you apply the stain, it stays on the surface of the wood, instead of penetrating it.

Some woods do not accept stain evenly and can look blotchy. What causes the blotchy appearance is that the stain will soak into one part of the wood more than another. Applying a wood conditioner or a sealer coat prior to staining can prevent this from occurring.
In many cases, the company that makes the stain will also make a wood conditioner. Always use products, which are matched for compatibility.
Unexpected variations in the finished product, both good and bad, often result from differences in physical properties from one species of wood to another. If you don’t like surprises, my advice is “Test, Don’t Guess”. Before you stain and varnish a production piece, test the finish on a scrap piece of the wood that you are using. Or test the coating on the backside of the sign. A final coat can sometimes darken a stained piece. Some woods look better unstained. Only stain something if it improves the beauty of the wood.
If the color of the stain is not what you had hoped for, you can lighten it with a thinner. Before thinning, “Read and Heed” the manufacturer’s instructions. You can thin many stains with turpentine or mineral spirits. If the color is not dark enough, apply additional coats until you achieve the desired color.
Sealer Coat. After you finish prepping the surface of the wood and staining it, many sign makers will seal it to provide a good foundation for the finishing coats. The accepted method for sealing is to coat the surface with a mixture of 50% varnish and 50% turpentine. This thinned mixture will more readily penetrate the surface of the wood and fill in its pores. To ensure chemical compatibility of sealer coat and the finish coats, always use the same varnish for the sealer coat as you use for the finish coats.
Dr. Francis Lestingi of Signs of Gold in Buffalo, NY offers an opposing point of view on sealer coats. After experimenting with thinned coats of varnish, he now recommends just following the manufacturer’s instructions. To prevent any clumps getting in the coating, he also suggests straining the varnish before using it. Then he applies three or four coats.
The best practice is for you to try different products and techniques on pieces of scrap wood and mount the test samples in a place where they receive the maximum exposure to UV light. The time spent on these experiments can help you select the right product as well as minimizing product failures. Once you find a product that works for you, stick with it.
Environmental Conditions. The temperature and humidity of your shop environment can greatly affect the outcome of your results, when you are varnishing. The optimal temperature for applying varnish is between 70⁰F and 80⁰F or 21⁰C and 27⁰C. This minimum temperature range is important for the flow out of the varnish. The proper temperature will also allow any bubbles to rise to the surface and disappear. Never apply varnish, when the temperature is below 60⁰F or 16⁰C.
In addition to shop temperature, the temperature of the varnish itself is also important for good flow out. In cold weather conditions, you can easily preheat the varnish by placing the can in a warm bath of warm water. If you use this method, warm the water to 110⁰F or 43⁰C.
After warming the varnish, strain it to filter out gritty particles in the coating. While you can strain the varnish through a paint strainer, you are better off straining it through a double layer of cheese cloth.
High humidity and moisture in the wood itself can also adversely affect your finished results. If the wood is not dry, the varnish can blister, crack and flake.
Do not subject varnish to freezing temperatures. When you are finished using the varnish, store it in a warm area of your shop. 70⁰ F or 21⁰ C is optimal.
Dust Control. One of the biggest challenges in varnishing is controlling dust. In a shop environment, dust can settle on tacky surface of the drying varnish. The longer the coating stays wet, the more likely it is for the coating to trap dust in its surface. To minimize the amount of dust and debris settling on the surface of the varnish, you should follow these painting practices:
- To control dust, practice good housekeeping in your shop. Cleaning should include regularly wet mopping the floors to keep the dust down.
- Do not varnish immediately after cleaning. Cleaning will send dust airborne. Let the dust settle first. Cleaning your shop can send dust airborne for hours. Many painters will wait until the end of the day to varnish, so dust producing activities will not contaminate their work.
- Prior to finishing, wipe the substrate down with a tack rag.
- Between coats, wet sand the finish. This will remove any dust that has settled in the finish. Wet sanding will also keep the level of airborne dust low. Sanding is especially important when using polyurethane varnish. Polyurethanes produce a very slick surface. Lightly sanding between coats will ensure good intercoat adhesion of one coat of polyurethane to another.
- Cover the varnished piece with a makeshift tent of visqueen or some other plastic film, to prevent contamination.
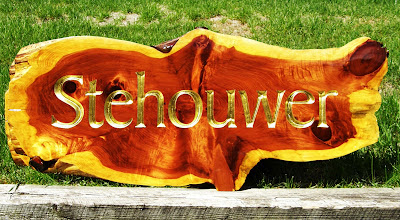
After carving the aromatic red cedar log, three coats of System Three Silver Tip epoxy resin were applied to the sign pictured above. For the finish coats the sign maker/master woodworker used Z Spar Captains Varnish from West Marine. The first varnish coat was brushed, followed by a sprayed coat. The letters were gilded with 23 karat gold applied over Rolco Slow Dry Size. Photo courtesy of Ben Van Houten of Wensco Sign Supply.
Varnishing Tips and Tricks.
- After you apply the stain, make sure that it is thoroughly dry, before you varnish.
- Although stains are typically applied with a rag, varnishes are usually more easily applied with a brush. The type of brush that you use makes a big difference in the finished appearance of your work. Invest in the best brush that you can afford. The main complaint with the cheap, disposable brushes is that they typically produce more bubbles than the natural hair brushes. Using a new, clean badger hair brush, will also prevent grit from contaminating the varnish. You should designate one brush just for varnishing. Before varnishing, loosen the hairs of the brush with your fingers, and shake out any of the dust. Then wash the bristles of the brush in clean turpentine. Thoroughly clean the brush after each use. (Note: the only type of varnish that is applied with a rag is a highly thinned varnish used in furniture finishing, called a wiping varnish.)
- Varnishing stained wood can darken the finished piece. To ensure that you can achieve your desired results, test the stain and vanish on a scrap piece of wood.
- Immediately before varnishing the wood, wipe the surface down with a tack rag.
- Before using varnish, read the manufacturer’s instructions. After sealing the wood, do not thin the varnish. Instead, use a new can of varnish as is. Never mix different types of varnish together. An adverse chemical reaction can ensue.· A new can a varnish is generally clean and free from any grit. It never hurts, though, to strain the varnish through double layer of cheesecloth into a clean can.· Dip your brush three quarters way into the varnish. After pulling the brush straight up from the can, let the excess varnish drain off of the brush for a few seconds.
· In applying the varnish, brush with the grain of the wood, using long straight strokes.
· Allow the varnish to dry thoroughly overnight, before applying the next coat. Before applying the subsequent coat, lightly sand the varnished surface. When sanding you should produce a fine dust. If the varnish begins to ball up, when sanding, stop immediately. The surface is not completely dry. After sanding, wipe down the surface with a clean, dry rag.
· For a durable finish apply three to four coats of varnish.
A Final Thought. Because each varnish is formulated differently, do your homework before making a product selection. Your research should include soliciting the advice of other sign makers and studying tech data sheets. Most importantly, whether you are a scientist or not conduct your own experimentation.
By experimenting with different products and different techniques, you will discover what works and what doesn’t work. “I always try to push the envelope to the extreme until I find the failure point,” advises Butch “SuperFrog” Anton. “Once that’s established, I can adjust my formulations and my techniques.”

For additional information on staining and varnishing wood signs, I recommend reading Dr. Francis Lestingi’s article “Wanted: an Elegant Sign” http://www.signsofgold.com/publications_28_1987381061.pdf . Photo courtesy of Signs of Gold, Buffalo, NY.


