What makes painting a challenge for sign makers, compared to vinyl application, are all of the variables. And with each variable the chance that what can go wrong increases. In fact, it seems that that guy Murphy has stacked the odds against us. Our only recourse is to identify the causes of our failures and learn how to avoid mistakes in the future.
Note that I stipulated “our mistakes”. As much as we would like to blame the manufacturer for all paint failures, the fact is that in a modern manufacturing facility with strict process controls, production related problems are generally less than 1% of material produced. Don’t get me wrong. I don’t absolve manufacturers of their responsibility. In some rare instances, the paint itself is out of spec and is the root cause.
The mistakes that painters are responsible for usually fall into a handful of categories that I will describe in detail in this article. Often paints fail because the painter takes a shortcut in surface preparation or is careless in application. Selecting the wrong product for a job is another reason paints fail. Extreme environments can also cause premature failure.
In troubleshooting paint failures, it is important to thoroughly collect as much background information as possible. If you keep detailed production records for each job, many of the answers to your questions should be at your fingertips. Good photography, careful collection of paint samples and a detailed written narrative are also critical in documenting problems, when you submit a complaint to a manufacturer.
While a sign maker can determine the causes of many coating failures, there is only so much that he or she can do in the field. A manufacturer has a number of scientific instruments in their lab that can accurately analyze any samples that you provide. That’s where the tech people can help. The information that you provide a manufacturer will help them in making recommendations.
Most of the problems that you might encounter fall into a handful of categories. Understanding these primary causes can help you identify the likely reasons for the failure so you can avoid problems in the future.
Substrate Preparation.
The foundation for a durable paint job is surface preparation, which includes the following three areas:
1. Cleaning contaminants from the surface;
2. Proper use of chemicals in pretreating a surface; and
3. Physically roughing up the surface to give it some tooth.
Before doing anything else, you must prep the substrate to remove contamination. If you are repainting a painted metal, it is absolutely critical that you remove any grease, oil or wax before you sand. If you sand without cleaning, the sanding process will only drive the contaminant into the substrate causing adhesion failure.
In wiping a surface down with cleaners, the right way to do it is to saturate a clean rag with solvent and wipe the substrate. Before the solvent has time to evaporate, use a clean dry rag or paper towel to wipe the surface dry. If you just wipe the surface with solvent, all you end up doing is moving the contaminant from one place on the substrate to another. Always use the solvents recommended by the manufacturer.
Failure to properly prep a surface prior to painting causes a very high percentage of problems. Contaminated surfaces, for example, can cause blistering. Silicones or oils on a substrate can result in fish eyes. Contaminants can also lead to adhesion problems.
Problems When Painting Metal.
Painting metal is much more difficult than painting wood. What causes most of the paint failures on metal is surface prep. Here are the usual suspects when troubles occur:
● The metal was not cleaned properly;
● The paint primer was incompatible with the finish coat; or
● The primer was not been completely dry before the finish coat was applied.
Painting aluminum can be especially tricky. Failure to remove the oxidation either mechanically or chemically prior to painting guarantees adhesion failure. Once you have removed any of the oxidation from the surface of the metal, you have a limited amount of time before oxidation occurs again. How much time? Some say about four hours.
To avoid paint failures on metal or fiberglass some painters recommend using a self-etching primer. This coating contains an acid that bites into the surface to promote adhesion.
Paint Selection.
Many times coatings fail because either the primer and paint were incompatible with the substrate or the wrong paint was selected for the service environment. Sign makers work with many different types of substrates. Each substrate has its own set of requirements, including surface preparation, primer and paint system.
Matched Components.
For the best results and to avoid problems such as the paint crazing or cracking, use a primer, paint, reducer and clear coat from the same manufacturer. This ensures that the different materials are all matched for compatibility.
Be careful when adding any solvent to the paint to thin it out. Paints are carefully formulated so that all of the ingredients are compatible with each other. Mixing an incompatible solvent with a paint can lead to disastrous results, such as cracking and wrinkling. If you need to thin a paint, it is best to use the manufacturer’s product. Some solvents flash off too fast, resulting in the outer layer of paint dying before the layer below it is fully cured. By trapping unevaporated solvents beneath the skin of the paint, the coating never fully hardens.
You also need to follow the paint manufacturer’s recommendations regarding compatibility of primer, paint and clear coat. The chemistry of these components is very complex and each part of the system interacts with the other. By following the manufacturers guidelines, you will achieve better looking, more durable results and encounter fewer problems.
Plastics.
While matching the components of a paint system is critical in avoiding problems, it is also important that the paint is compatible with the substrate, especially when painting a plastic substrate. The surface energy of a material directly affects paint adhesion. Solvents used in surface prep and thinning of the paint can affect the performance of the plastic sheet.
Because various plastics are formulated and processed differently, each can have its own unique characteristics, requiring special consideration and treatment prior to painting. For this reason, before spray painting either acrylic or polycarbonate sheet, carefully read the manufacturer’s technical bulletin and follow their recommendations regarding surface preparation, primers, approved solvents and paints, and spraying techniques. In thinning the painting, use the recommended solvents and never substitute with unapproved solvents.
Strong solvents in the paint subject the plastic sheet to a chemical stress. That chemical stress, in addition to the mechanical stresses that are subjected upon the sheet during fabrication, can greatly reduce its impact resistance, which can contribute to breakage.
Primer Selection.
Selection of a paint primer, which is the foundation for a good paint job, is also critical. Contrary to what many say, it is not just a cheap paint. It serves a couple of basic and very important functions:
First, when painting a porous substrate, such as drywall or wood, it seals the surface. In some cases, it can serve as a barrier coating. For example, a latex primer, such as Zinsser Bulls Eye 1-2-3 Primer is more effective than oil based primers at blocking tannins in a wood substrate from bleeding through the paint. Applied to an non-porous substrate, such as high-density urethane (HDU), the thick coating can fill in the sandpaper-like surface, transforming it to a smooth, even finish.
Primers are also critical in anchoring or bonding the finish coat to the substrate. That’s why selecting the right primer has a direct impact on the durability of the paint job.
Paint Application.
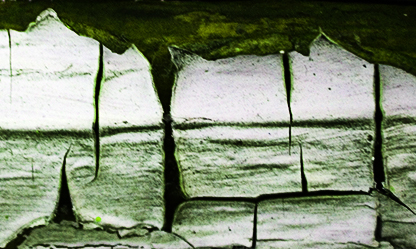
Thick coatings of paint often result in problems such as wrinkling or sagging. Heavy applications of paint can also cause mud cracking in which the paint has the cracked appearance of dried mud. Other reasons for cracking are not allowing enough time for a coat of paint to flash off before painting a subsequent coating of paint or failure to sufficiently stir the paint before use.
A heavy application of paint, though, isn’t the only reason that paint can sag or run. Adding too much thinner also makes a paint too runny. That’s why its important to reduce your paint according to the manufacturer’s instructions. High ambient temperatures can also thin the viscosity of the paint, making it watery.
Drying and Curing.
The conditions under which a coating cures or dries can affect the paint’s appearance and performance. In addition to its binder or resin and its pigment, paints contain water or solvent, which evaporate during drying or curing. When water or solvent becomes trapped within the paint or the paint dries too quickly, problems occur. Here are some of those problems:
High temperatures can cause solvents in a paint system to evaporate too quickly causing pinholes.
If any moisture is trapped in a wood substrate and does not breathe out of the wood, the trapped moisture can cause blisters or peeling paint. Other causes of blistering include painting in a humid environment and not allowing the substrate to dry sufficiently after wet sanding.
To prevent moisture related problems only paint when substrates that are thoroughly dry. Avoid spraying when the weather is humid. It’s usually better to wait until conditions are right. If you are pressed for time, and are force to paint when humidity is high, add a retarder to your paint and allow for some extra flash time.
To prevent trapped solvents you can take a number of precautions. These precautions include:
(1) Only use reducers that the paint manufacturer recommends.
(2) Always follow the manufacturer’s application guidelines.
(3) Between coats of paint, follow the manufacturer’s guidelines regarding drying time. Also be aware that some finish paints dry so hard that if you wait too long before painting another coat, you can have problems with inter-coat adhesion. In some cases, if too much time is allowed, components in the paint can bloom to the surface, which can prevent the subsequent coat of paint from adhering to the primer coat. Top coats of paint should be applied within a couple of weeks after the primer is applied.
(4) Avoid painting heavy coats of paints. Instead paint lighter coatings and allow sufficient time between coats for the solvents to evaporate.
Environmental Damage.
Prior to manufacturing, survey the application and make sure that you thoroughly understand the conditions to which the sign will be subjected. This will help you select the right paint primer and finish paint for the job. Some of the environmental extremes that cause paint problems are UV light, heat, cold and moisture.
In some regards we are at the mercy of the weather. Is there anything that we can do other than complain? The answer is yes! The purpose of a site survey is to identify the potential problems and select the materials that prevent premature deterioration.
Temperature extremes, especially high temperatures, can prematurely age both painted and applied graphics. Intercoat peeling can also occur, if the undercoat of paint was not properly prepared. Sanding between coats can give the undercoating some tooth, which will promote and ensure good adhesion between layers of paint.
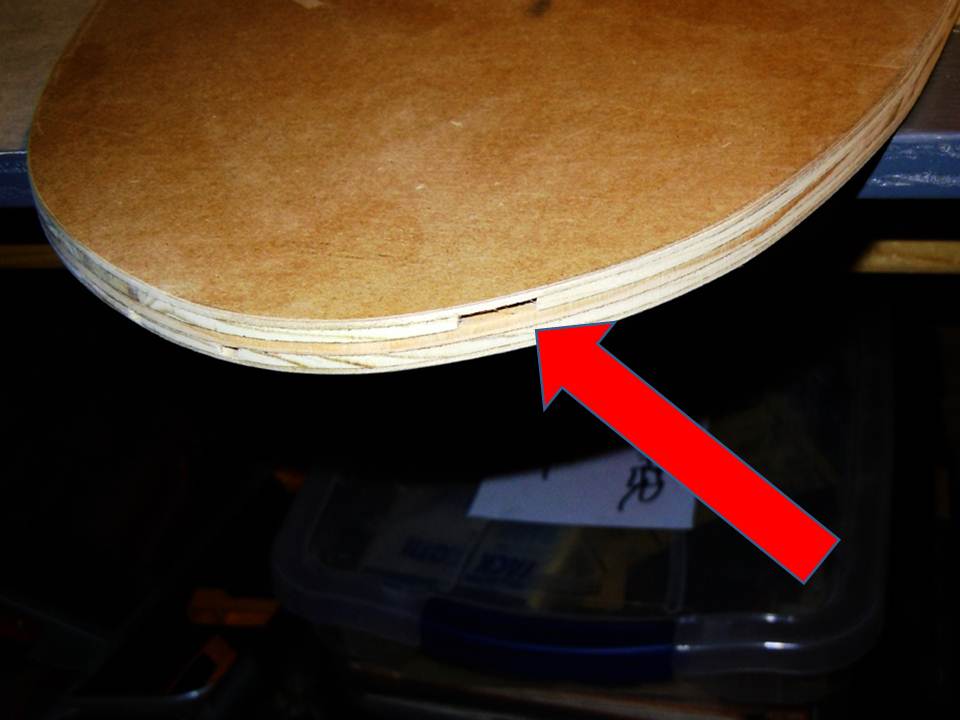
Moisture causes countless problems with wood signs. Many of these problems start at the edges of the sign, where moisture can enter. See the photo below. To avoid deterioration at the edges you should fill any gaps in the wood and use a round over bit to smooth the sharp edges, which are prone to chipping and splintering.
Conclusion
Properly applied, a painted sign can provide up to 10 years of service life or more. To ensure the maximum durability from your paint job and to avoid problems here is a summary of my suggestions:
1. Read the Manufacturer’s Technical Information.
I started this article, stating that what made painting so difficult were all of the variables that increased the odds of making mistakes. Put the odds in your favor by doing your homework. Read the manufacturer’s literature and follow their guidelines.
2. Ask for Help.
No one has all of the answers. You just need to know where to find them. I have been lucky enough to make friends with some of the most experienced sign painters in the business, who can provide me with reliable advice, when I have a question.
3. Ask Better Questions.
To paraphrase self-help guru, Anthony Robbins, if you want better answers, ask better questions. This is especially true when you are troubleshooting a problem. In asking questions, remember the Rudyard Kipling’s six honest serving men who taught him everything he knew: who, what, why, when, where and how.
4. Test, Don’t Guess.
Albert Einstein said that “a person who never made a mistake never tried anything new.” You should keep your mind open to new products, new ideas and new ways of doing things. However, I would much rather avoid mistakes altogether. That’s why I suggest that if you are trying out something new, test it first.
Before production, test the paint on the substrate for good adhesion by performing a simple tape test or a cross hatch test. When spray painting it is also a good idea to spray some test panels as a habit, just to check whether the paint is thinned to the right viscosity or to check your air pressure settings are correct.
5. Document Your Paint Processes.
Sometimes when you are making something new for the first time, you have to learn how to do it right. As you are going through your learning process, document what you did, so you can reproduce your results.
6. Stick with What Works.
As you can tell, I believe in trying new products, and new paint processes. But as one of my friends in the industry told me, “if it works, continue to do it. If it doesn’t, then try something else.”


