My flight out of New Orleans wasn’t leaving for several hours. Just a few miles from the airport, was the antebellum Destrehan plantation overlooking the mighty Mississippi River. So I had plenty of time to take the guided tour.
Walking through the mansion, the marble mantles and sides of some of the fireplaces caught my eye. (See the photo below.) They were absolutely beautiful. The look of marble complemented the Greek Revival style on the exterior and interior of the 18th century home.
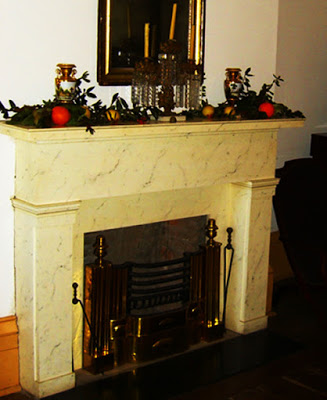
Contrary to what Flip Wilson said, what you see is not always what you get. What looked like marble was actually painted. Real marble was extremely expensive hundreds of years ago, as it is today. The next best thing was to create an illusion with paint.
The technique of creating painted illusions was perfected centuries ago by French artists, who coined the term “trompe l’oeil”, which means “fool the eye”. You will remember that two hundred and twenty years ago, when the plantation was built, France owned Louisiana. So finding French faux finishes in a plantation home should not come as a big surprise.
The paint and brush sign makers of bygone generations knew the various faux techniques, such as marbling, wood graining and stenciling. The old time professional painters had also developed the skills of mixing their own colors on the job.
“The old sign painters had a varied repertoire of techniques,” says Tod Swormstedt, founder of the American Sign Museum in Cincinnati, Ohio. “If a sign painter didn’t have enough sign work to keep him going, he supplemented his income by painting houses. This was common during the Depression Era of the thirties. A painter, who used faux finishes in decorating interior walls of homes, often incorporated these techniques in his sign painting.”
(Note: The New American Sign Museum opened up this summer. For full details follow the link to my story.)
Faux marble finishes were occasionally used for backgrounds for signage. Used in combination with gold lettering and graphics, the Old World beauty of a marble pattern can give a sign a very elegant look that would be appropriate for banks, a lawyer’s office or a jewelry store.
A few vinyl companies had carried marble and wood grain patterns in their film lines. Most of these films have been discontinued or the selection has been pared down to one or two choices. What’s a sign maker to do if he wants to recreate the beauty and splendor of marble?
Of course, if you have a printer, you can digitally print the background. If that’s not your cup of tea, your only other alternative is to try your hand painting a faux finish. Sign makers have developed several different techniques. In this month’s, column, I will cover tools of the trade, materials needed, recipes for making glazes and some tips and tricks used by your fellow sign makers.
The processes described in this article involve several different steps. Some of the techniques utilize an additive process, in which you will apply two or more layers of transparent colors over an opaque base. Other techniques are subtractive in nature. In subtractive process, you will use materials such as plastic grocery bags or sea sponges to pull some of the applied paint from the substrate.
Of course, there are no strict rules for achieving your desired end results. So feel free to experiment and try any combination of techniques. Creating a surface that looks like the real thing involves time, patience, some artistic skill and, most of all, plenty of practice.
Tools and Supplies.
As you shop for faux finish tools, you will discover that there’s a lot to choose from and the cost for the tools of the trade can mount up fast. If you are a tool junkie, as I am, you can spend a lot of money on a lot of gadgets that you may never use.
While it is always good to use the right tool for the job, the real determinant between a professional and an amateur job is not who has the most tools on the job, but who is most skilled in using the tools. Some of the most accomplished professionals only have a few tools in their bag of tricks.
Some of the tools and supplies that you will need to paint a faux marble finish are listed below:
- Base color (1 Shot Lettering Enamel)
- Universal colorants
- 1-Shot Gloss Tinting Clear #4000
- 1-Shot Reducer
- Mineral Spirits
- Frog Juice Clear Coat
- Sea sponges
- Lint-free rags
- Cheese cloth
- Glad plastic kitchen wrap or plastic grocery bags
- Turkey or goose feathers
- Foam brush
- Foam roller
- Roller tray with disposable liners
- Soft badger blending brush
- Latex gloves
Planning Your Work.
Before you pry open a can of paint, it helps, if you have some idea of what marble or whatever type of material you are trying to replicate, actually look like. So get a picture of marble or wood that you can use as a guide. If you don’t know what real marble looks like, you can either go to the library to find a photo or you can search on line for a picture. Better still, use a slab of marble from a tile store or a piece of wood to work from. You might be surprised as you are doing your research to discover that marble comes in a wide array of colors and patterns.
After you do your research, select a photo or sample to work from and collect your tools and supplies, it’s time to practice, so you can perfect your technique. It’s also time to play mad scientist and experiment with different blends of materials. If your raw materials are not compatible, it’s better to find out on a piece of scrap than on a customer’s job.
“I always try to think through a job, before I jump into it,” says artist and master gilder Jill London of London Gold, “If I am working on a complex project, I break the job down into its component parts. That helps me determine the materials
I need, what I need to do, and the sequence of events.”
For most people, replicating the appearance of marble on the first surface of a substrate is difficult enough. Now imagine marbling the second surface of a glass sign. Everything must be done in reverse. To pull it off, takes planning. In creating faux finishes on a glass panel, foregrounds must be applied first, with the background or basecoat being applied last.
In decorating glass panels, some artists will also apply transparent glazes, and then back up the color with gold leaf or silvering. Painters will use a variety of traditional recipes for making glazes. In the sign industry, many of the sign painters will mix lettering enamel with a tinting clear. By layering one color over another, you can produce colorful and expressive painterly effects.
Another way to create glazes is to use transparent 59000 series screen print inks from Nazdar. You can either screen the ink or thin it out and spray paint.
Another technique for creating a unique gold leaf texture is to tint your size with one color of glaze. After dabbing some on the glass panel with a plastic bag, apply your gold leaf. Follow the first application of leaf, by dabbing on more size tinted with another color and more gold leaf. Repeat the procedure until you have covered 75% or more of the glass surface. Then back up the gold leaf with black or brown.
Choosing Colors.
In most cases, faux finishes require several different layers of transparent glazes. Some colors work with each other. Others don’t. So choose your colors wisely. What usually works in creating a marble finish is to select different shades of the color that you use for the base coat. In creating a faux marble finish, you will first paint a base coat of an opaque color. Over this base coat, you will then apply layers of transparent glaze.
Usually you will want to use glazes that are several shades removed from the base color. The greater the difference in value between the colors, the more dramatic the texture will be. (Value is the lightness or darkness of a color.)
Mixing Glazes.
The old time sign painters and house painters mixed their own paints. In their trucks, they would carry pigmented pastes, called universal colorants. Using these pastes, the painters would compound their own paints by mixing the colorants into a white paint. Or they would add the pastes to a varnish or clear coat to create a transparent glaze.
In the bygone days of yesteryear, universal colorants were pretty common and you could easily pick them up at your local Ace Hardware store. The days of painters mixing their own colors pretty much ended after 1980. Of course, there are always a few reactionaries that will always swim against the current of change. God bless them. The old timers are still preserving a time-honored tradition that would otherwise be gone forever.
If you want to find universal colorants, you will need to look real hard. Good luck finding them. I had to drive north of Chicago to buy mine from an Epco Paint center. The brand that I bought was Tints-All© made by the Sheffield Bronze Paint Corporation.
The colorants come in a variety of container sizes up to quart and gallon cans. That’s too much in many cases, so these pigmented pastes are also available in 1.5 oz. tubes. Just the right size for small projects! The small tubes are also priced at less than four dollars each, so you can pick up a dozen of them (there are more than 30 colors) and do a little experimentation.
When mixing in a universal colorant, here are a few words of advice: easy does it. Start with a small amount of colorant. Then blend in more colorant, little by little, until you get the color you want. If you add too much, thin the glaze. Adding too much can result in poor paint adhesion. So how much is too much? In mixing up a batch of glaze, the amount of colorant should never exceed 20%.
There are several advantages to using a clear coat such as 1 Shot’s oil-based Tinting Clear (product #4006). The coating is more durable than water-based glazes and is suitable for outdoor applications. When mixing up a glaze, what you see when it is wet, is what you see when the glaze dries.
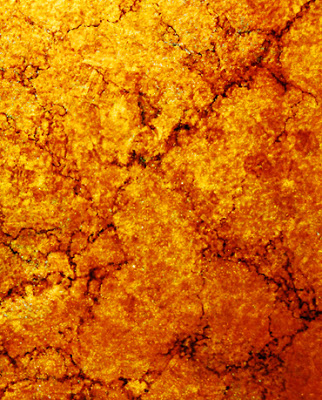
I sponged on different colored glazes onto the panel above to create the texture and hue of real stone. Many of these glazes were mixtures of 1 Shot Tinting Clear and Pearl Ex Powdered Pigments. The veins were painted using a brush called a spotter, which has a very small head.
Yet, its biggest advantage can also its biggest disadvantage. Oil-based glazes can take a while to dry. Drying times for 1 Shot’s clear can be between 12 and 16 hours, depending on the ambient temperature of your shop. The type and amount of colorant that you use in the glaze also affects drying times.
One the plus side, the extra time gives you a chance to manipulate the glaze while it is still wet. This can be important if you are using a subtractive technique, such as pulling off some of the applied coating from the sign substrate using crumpled plastic wrap or a sponge. That’s great if you need the extra time. But if you or your customers are in a rush, waiting for a glaze to dry can be more annoying and frustrating than waiting for a pot of water to boil.
The three primary ingredients in mixing up a glaze are the colorant, the vehicle and the binder. For the colorant you can use either a universal tint or 1-Shot paint. For solvent-based paint the vehicle can be turpentine or reducer. And for the binder, you can use varnish or tinting clear coat.
Sign makers have developed many different glaze concoctions. Using universal colorants or lettering enamels, you can tint a clear coat, such as 1 Shot® 4006 Super Gloss Tinting Clear. This mixture can be thinned adding up to 5% reducer or mineral spirits. Don’t overdo it with the thinner, or your glaze will be too runny. You want the glaze to have some body to it. If you need to, you can add a little whiting to the mixture to thicken it up. For a flat finish, you can also mix in some of 1 Shot’s clear flattening paste (432-9500).
You can also make a glaze using an oil-based varnish, blending equal amounts of varnish, mineral spirits, and Penetrol. To this mixture, you will add either colorant or lettering enamel. If the glaze is too thick, just add more mineral spirits, a little at a tint, until you attain the desired viscosity. If the glaze is too runny, add more varnish.
In mixing up glazes, be careful what you add to the mixture. White and black paint can lighten or darken the color. But they are also opaque, so they can kill the transparency of a glaze or make it translucent at best.
Surface Preparation.
Proper surface preparation ensures good paint adhesion. How you prep the surface depends on the surface itself. Some of same best practices that you would follow to prep a substrate prior to vinyl applications, also apply to painting.
Regardless of what type of substrate that you will decorate, you must first thoroughly clean the surface. Prepping a painted surface, such as an aluminum composite panel, includes washing the substrate with a non-abrasive detergent and water; then cleaning the substrate with wax and grease remover; and finally wiping down the surface with isopropyl alcohol.
After the surface is thoroughly cleaned, lightly abrade the surface with a grey Scotchbrite pad. Scuffing the surface with a Scotchbrite pad is not the same thing as sanding the surface. All the pad does is to scratch the surface. These very fine scratches give the substrate some tooth for the paint to adhere to.
If you are decorating an unpainted surface, you will need to prime it. What type of primer you use will depend on the surface. If you are painting a wood sign blank, you might try thinning out some of your 1-Shot lettering enamel and using that as a primer. The wood will soak up the thinned out paint. This accomplishes two very important functions that any type of primer needs to achieve. First it seals the substrate. And second, the primer creates good adhesion between the substrate and the base coat.
Begin With A Good Base.
The base coat is your foundation for your faux finish. Whether you begin with a light base and layer on darker tones, or start with a darker base and apply lighter tones of a glaze, all depends on the effect that you are trying to achieve.
Using a foam brush or a foam roller, paint the first of two coats of your base color. Enamels dry from the outside in. Which means if you lay it on too thick, you could create some problems for yourself. To avoid these problems, thin out your paint to the right consistency and apply thin coatings of paint.
After the initial coat is completely dry, wet sand the surface with 600-grit sandpaper. The sanding process will achieve two ends. First, if you have any clumps in the finish, you will sand them away, leaving a smooth, uniform finish. Second, sanding will put very fine scratches in the surface so it will have some tooth for the second coat to bite into. This will ensure what they call “good intercoat adhesion”. After painting the second coat, wait 24 hours for the paint to fully dry.
Addition and Subtraction.
The next step is to dab on a couple of different transparent tones of color in the same family as the base color. Before you start dabbing, you will need to mix up the desired colors.
In applying a glaze, you can use either additive or subtractive techniques. The term “additive technique” refers to the gradual application of a color, until you achieve the desired effect. Subtractive techniques involve applying a light layer
of transparent or translucent glaze to the surface. Then using a sponge, rag or plastic bag, some of the glaze is removed from the sign surface.
Additive Technique: A Little Dab Will Do You. In applying the layers of paint over the base color, easy does it. If you were around when guys put greasy kid’s stuff in their hair, such as Brylcream, you will remember the slogan: “a little dab will do you.” That’s good advice when you are painting the shades of glaze over the base. Here are a couple of tips that will help prevent laying it on too thick.
Using a sea sponge is great for creating the grainy texture of a stone surface such as granite. If you are using a sea sponge to dab on paint, whatever you do, don’t dip it directly into the paint. The sponge will soak up too much of the paint, well, like a sponge, resulting in an excessive application of paint. Instead use a paint brush to apply the paint onto the sea sponge. In dabbing the sponge onto the base color, don’t press too hard or you could leave a big blob of paint on the surface. Pressing too hard will also smear the paint.
Here’s another way to do it. “Bazooka Joe” Balabuszko recommends palleting a thin coat of glaze on a cookie sheet or a metal panel. Then lightly touch the sponge or whatever else you are using onto the palette. If you end up with a glob of paint on the surface, you can remove it by bagging it off of the surface with a plastic grocery bag. Just make sure that you use the side of the bag with no printing on it or you could end up with the corporate colors of your local grocery store on your panel.
In nature the different shades in a slab of marble are random. For that reason, rotate the sea sponge as you are working, so you don’t create a repetitive, unnatural-looking pattern.
The coloration in marble is often very complex with many different shades of the same hue. Layering the two or more transparent glazes over the base coat will create this dappled blend of colors. To soften the transition from one color to another and blend the colors, you can very lightly brush the wet glaze with a badger blender. These brushes aren’t cheap. Depending on whether the hair of the brush is natural or synthetic, the size and shape of the brush, and who is selling it, prices can very greatly. Badger blenders can cost from $10 to $150 per brush. So shop around. Dick Blick, however, has a couple of reasonably priced badger blenders for under $20.
Subtractive Technique. Just as there are many ways to layer glazes onto a substrate, there are also a few different tools and techniques for removing wet glaze from the surface along with giving the surface some texture. Some tools that you can use in subtractive painting are plastic film (such as a grocery bag), rags and sea sponges.
In creating a marbling effect, many sign makers use a crinkled up grocery bag or plastic kitchen wrap. The technique is simple. Just apply the plastic to a thin coat of wet glaze. You can scrunch up the applied plastic to create patterns. Then rip off the plastic in one clean motion to remove the excess paint.
To remove excess paint you can also dab the wet coating with a sea sponge. Using these subtractive techniques will give the surface an interesting texture. As the sponge, rag or plastic bag becomes saturated with paint, you should discard it.
Painting The Veins.
Most pieces of marble exhibit veins of white or a shade of grey. In nature, these veins randomly pass through a marble slab, sometimes criss-crossing each other. For this reason, any attempt to create a pattern would look out of place. The appearance that you should try to achieve is that of raggedly torn paper.
You can add veins to a faux marble finish using a fine point brush. Some stores will sell special veining brushes. Many sign painters and professional decorators will use a turkey feather to create the veining. A couple a goose feathers cost a little less than $3. Using a feather, you can paint in the very fine, erratic lines that distinguish marble from other stones.
To create some really fine lines, you can spread apart the veins of the feathers and squeeze the individual sections of the feather together to create fine brush tips.
In painting in the veins, use a photograph or sample piece of marble as your point of reference. As you examine the real thing, you will notice not only the randomness of the direction of the veins, but that these lines will also vary in width.
As a word of advice, when you are painting in the veins, don’t overdo it. Lightly drag the strands of feather across the surface, painting the veins in the marbled surface. Don’t worry if your hands are a little shaky as you paint with the feather. It actually is a good thing.
Clear Coating.
After completing your faux finish project, you can apply a clear coat, such as Butch Anton’s Frog Juice, which comes in both spray and quart cans. Clear coating will protect your painting from damage from abrasion and UV degradation from sunlight.
To achieve a good, thick coating of this protective finish, apply the clear coat with a foam brush. If the Frog Juice has thicken as a result of exposure to air, you will need to thin it with mineral spirits, otherwise you will show brush marks.
Thinned to the right viscosity, the clear coat will level out and any of the brush marks will disappear. You can add as much as 25% mineral spirits to the clear.
If you want to deaden the gloss level of the clear coat, try adding a little refined whiting powder to the mixture up to 10%. Or you can also blend in some clear flattening paste.
Final Words of Advice.
Confucius is credited with saying that if you hear something, you forget it; if you see it, you remember it; but you only truly understand something if you do it. In learning faux painting techniques that’s great advice.
Getting good advice from an accomplished professional will accelerate your learning curve. While having a pro show you his techniques is invaluable, learning by doing is the best. Through a process of trial and sometimes painful error, try out what you have heard, read and seen. Then decided which techniques work and don’t work for you.
To avoid failures resulting from incompatibility issues, try to use paints from the same manufacturer. Another recommended practice is to “Test, Don’t Guess” the raw material that you will use for compatibility.
Other than that, have fun painting.


