Because metalized vinyls exude an opulent aura, these eye-catching films are a popular choice in the design and manufacture of OEM emblems and trim. What’s more, their attractive and luxurious appeal complements the appearance of high-ticket products, such as RV vehicles and marine craft.
To enhance the appeal of these graphics, some OEM printers coat their printed emblems with a liquid “doming” resin. Doming is the process of depositing a glass-like, plastic-resin bubble over the top of a printed film. By doing this, it transforms a thin flat film into a dimensional emblem that looks just like a vacuum-formed or molded part. Doming transforms flat, two-dimensional graphics into three-dimensional emblems and magnifies the alluring patterns of the metalized films.
Equally important, the doming resin protects the graphic from the degrading effects of UV light, dramatically extending the life of the printed film. For example, the domed VinylEfx® emblem pictured below was tested at an independent lab in one of their weatherometers. After simulating five years of outdoor weathering, the printed and domed graphic exhibited no deterioration.
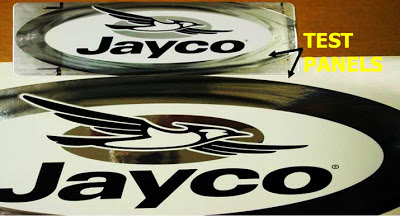
Several years ago I visited the Q Panel testing labs in southern Florida to examine vinyl graphics that had undergone accelerated weathering equivalent to three years of outdoor exposure. The screenprinted and domed graphics panels looked like new.
The difference is that you don’t need expensive tooling and production equipment. In fact, for an investment as little as $100 to $150, any sign maker could produce cool-looking, saleable products.
More importantly, what should interest you is what doming can do for your business. Doming is simply another way you can differentiate your company from the competition. By converting standard vinyl graphics into rich-looking signs, you add value to your graphics that can command higher selling prices and add to your bottom line.
Resin Types.
Resins typically fall into one of three classes of materials:
- Epoxies;
- UV-curable resins;
- and Polyurethane resins.
Within each classification, several products are available. For outdoor applications, most signmakers, and companies that specialize in doming, choose polyurethane. After comparing each material’s performance characteristics, you’ll see why polyurethane is the best choice.
Epoxy resins are popular for doming such advertising applications as key tags, badges and plaques. Available as one- or two-part systems, epoxies are inexpensive and easier to use than other materials. Because epoxies cure slowly, air bubbles trapped in the resin often rise to the surface and disappear, forming a bubble-free finish.
Unlike polyurethane resin, epoxy doesn’t react with humidity in the air. Thus, you can work with it without having to run your air conditioner or dehumidifier. In addition, epoxy resins are user friendly and cure at room temperature.
Because sunlight yellows the clear, plastic material, epoxy resins aren’t suitable for outdoor use. Plus, due to their softness, epoxy resins can be easily scratched.
Next are UV-curable resins, which fall into two classes: low- and high-intensity. Although low-intensity doming liquids cure when exposed to black light, others require high-intensity, UV-curing units.
UV resins work similarly to UV-ink systems. Exposure to UV light initiates a photochemical reaction that quickly hardens the liquid. In contrast, other resin types require hours, and sometimes days, to fully cure.
UV resins are ready-to-use, one-part systems — no measuring, no mixing and no bubbles. Plus, they’re relatively safe to use.
Unlike one-part systems, two-part epoxy and polyurethane components must be mixed, which often generates bothersome little bubbles that usually end up in the dispensed doming liquid.
In the future, UV-curable resins might be suitable for high-volume production shops, but not for sign shops. Here’s why: Low-intensity, UV-curable resins harden after being exposed to a black light (the same type of black light common to the 60’s and 70’s hippie era). Further, low-cure resins don’t withstand prolonged outdoor exposure — after six months in the sun, they begin to yellow. As UV exposure continues, these resins cure and harden until they become brittle and crack.
High-intensity, UV-curable resins cure in approximately 15 seconds, after having been exposed to a special light source that costs thousands of dollars. Thus, unless you specialize in high-volume production, these systems aren’t for you.
Most signmakers and screen-printers I know use two-part polyurethane systems comprising a resin and an isocyanate curing agent that hardens the doming liquid. Although working with polyurethane resins is typically burdensome, such resins can withstand outdoor rigors. Because they resist yellowing, polyurethane resins are suitable for vinyl graphics and other signage applications, including OEM decorative emblems, nameplates and labels.
In addition, the material remains flexible and doesn’t crack, craze or flake. Polyurethane resins not only weather well, but they also block UV light and, in turn, protect the material they cover. This means the base vinyl and printed image will survive longer outdoors.
As wonderful as polyurethane resins are, they have one major drawback — they’re hygroscopic. They suck up moisture like a sponge. Any moisture absorbed by the doming liquid reacts with the resin and forms tiny bubbles of carbon-dioxide gas. Thus, to minimize bubble formation, you must control your shop’s humidity.
Safety Tips.
Before using doming liquid, read the manufacturer’s instructions and the OSHA Material Safety Data Sheet. Because doming liquid can unexpectedly spurt out of the dispensing nozzle, wear safety goggles. If you get some resin in your eyes, immediately flush them out with water and seek medical attention.
To avoid skin irritation, wear the rubber, surgical gloves; however, never rub your eyes with the gloves. Further, keep food and drinks out of the work area, and don’t smoke. Finally, when you’re finished working with the material, thoroughly wash your hands with soap and water. Am I starting to sound like your mother yet?
Doming liquid can emit small amounts of slightly toxic vapors, including trace amounts of hydrogen cyanide and mercury vapor. In most cases, this doesn’t pose a problem. However, if you breathe enough of these fumes over an extended time period, you could damage your lungs. Thus, if you do a lot of doming, ensure your work area is properly ventilated. After all, it’s better to be safe than sorry.
Work Environment.
Controlling a finished product’s quality demands controlling your work environment. Companies that specialize in domed graphics, such as Sunwest Screen Graphics (Winnipeg, Manitoba, Canada), conduct their doming operations in a clean room with controlled temperature and humidity to keep their scrap rates down.
After conducting interviews with production people at different companies, I learned some helpful tips, which I will share:
When you’re doming, your work surface and any drying racks must be level, or the resin will run to one side. To ensure its floors were perfectly level, one company poured new floors before it moved into its new manufacturing plant. I’m not suggesting you pour new floors. However, you should put a level on a worktable and make any necessary adjustments.
Keep your work environment air dry and warm. As the air’s humidity increases, so do the doming liquid’s bubbles. During my first doming attempt, I primarily worried about humid conditions. Thus, I ran my air conditioner for a few days prior to using the doming resin. With dry air, I avoided bubble problems.
To control moisture, some shops use dehumidifiers. One company that I interviewed maintains a temperature of 70°F and relative humidity of 55%. Other shops keep the humidity as low as 45%.
Temperature, as you might imagine, plays a big part in the curing process. Curing can actually be accelerated at elevated temperatures. Some manufacturers have special drying rooms for this process. The manufacturer of the resin that I have used recommends curing domed parts at 77°F.
Fortunately, I didn’t encounter humidity and bubble problems. Rather, dust was a big problem. Before doming, I mistakenly cleaned my floor, which made the dirt and debris airborne. Thus, dust settled on my parts as they were drying. To control airborne dust, floors should be sealed or tiled, and walls should be covered with a latex paint. And, routine cleaning is essential.
Doming Procedures.
Several signmakers have mentioned numerous doming problems, including bubbles forming in the resin, parts that won’t dry and high scrap rates. But don’t let this discourage you, because doming isn’t that difficult.
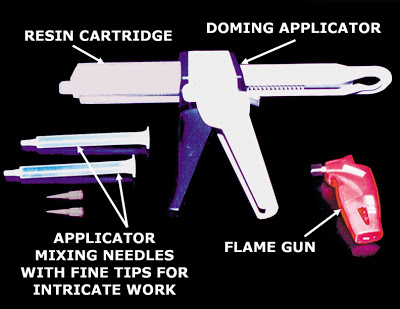
A doming starter kit costs between $99 and $250, and includes everything you’ll need: a dispensing gun with several mixing needles, a pro-pane flame gun, a repair tool, purge cups and protective gloves. (See the photo below.) Further, during the doming process, you’ll need to keep track of time, so keep a clock or a kitchen timer handy.
Starter kits also provide a sheet of adhesive-coated glass. After you weed your graphics, stick the vinyl graphics’ release-liner side to the glass sheet — this ensures your graphics remain flat. I needed additional glass sheets, which I covered with RTape paper application tape and spray-mount adhesive. Covering the glass with tape simplifies cleanup. When you’re done, just remove and dispose the tape.
For my first project, I domed approximately 50 screenprinted and thermal, die-cut decals the size of a silver dollar. This may not have been a very challenging job, but it was a helpful, first-time doming project.
Numerous vinyl graphics can be domed, including steel-rule, thermal or die-cut decals, and plotter-cut graphics. Plotters produce the best results, because the edges are clean. Conversely, die cutting can sometimes fracture decals’ edges, creating a channel where the doming liquid can spill over the edge.
When you dome a cut-vinyl graphic, you substantially increase the part’s overall weight. Consequently, the shear strength of the domed vinyl’s adhesive is critical. If it can’t support the additional weight, your graphic could slip down the side of a sign substrate or vehicle.
You can also dome various printed graphics, including screenprinted, thermal resin and inkjet. Doming printed graphics requires the ink system to be completely dry. Also, be aware that some inkjet inks are hygroscopic, meaning they readily absorb and retain moisture. Any residual moisture in the ink system can react with the resin and form bubbles. Thus, before charging headlong into production, test a graphic system’s components for compatibility.
The dispensing gun in my kit uses cartridges with two chambers — one for the polyurethane resin, and one for the hardener. For signmakers, this system is ideal because there’s nothing to measure. The two components are mixed together inside the system’s mixing needle.
Companies that specialize in doming may choose automatic dispensing machines that can measure, mix and apply precise amounts of liquid onto the part. That’s ideal, but such sophisticated equipment costs thousands of dollars, so your volume must justify the investment.
My kit offers a fairly simple process. You just slide the cartridge into the applicator (which is similar to a mini caulking gun), snap off the cartridge’s tip, and then snap on the applicator’s mixing needle. With the gun tip pointing up, allow the bubbles to rise to the top for a few minutes. As you depress the trigger, the components start to flow and mix together. Do this slowly, or the components won’t mix properly. Dispense a few milliliters of the doming liquid into a plastic purge cup, until no bubbles appear in the resin.
Be prepared to clean up spills. The first time I used the dispensing gun, the resin shot a couple feet into the air. Fortunately, I was wearing safety goggles. Also, because I had anticipated a mess, I covered my work table with application tape, which enabled me to clean up quickly after completing the project. The process of dispensing the resin is pretty simple — simply pull the dispensing gun’s trigger.
Almost any vinyl-graphic shape can be domed. For simple shapes, such as circles, apply a few drops of liquid into the center of the decal, and allow the resin to flow out to the edge and level out. This might require 5 to 10 minutes. A domed part’s height can vary from 0.06 to 0.08 in. For more complex or intricate shapes, use the repair tool to coax or guide the liquid to the graphic’s edge. Or, you can use a metal tool, such as a knitting needle. Generally, it’s better to round, rather than square off, corners of lettering or graphics. With patience and a steady hand, you can dome some intricate shapes.
Vinyl isn’t the only material you can dome. Just about anything that isn’t porous — metalized polyester, metals, and such plastics as acrylic and polycarbonate — will work. (Note: Anything that’s porous can absorb moisture from the air and cause bubbles to form in the doming liquid. I’ll discuss bubbles later.)
Doming liquid’s resin has high surface tension, which binds it together. When applied, the resin flows out until it hits the part’s edge. At that point, the doming liquid hangs on the edge for dear life. The resin spills over the edge if you apply too much liquid, and the liquid’s weight exceeds its ability to hold itself together.
Spillage is rare, approximately 1%. And you can always scrape up any excess with the doming kit’s repair tool.
After approximately 10 minutes, inspect the domed graphics for bubbles. Flame-treat the graphic if any bubbles appear. Many available doming kits provide a small, pro-pane-flame gun — the size of an oversized cigarette lighter — with
its tip bent at a right angle. The propane torch you may have used for vinyl applications would produce too much heat in this situation.
After igniting the flame gun, hold it 3 to 6 in. from the domed part. A blast of hot air should remove the trapped, carbon-dioxide bubbles. I overdid it the first time — by overheating the resin, I sealed the surface and permanently trapped a zillion little bubbles inside the domed part.
Another trick I’ve learned, but haven’t tried, is to poke the curing resin with a sewing needle, and carefully draw or guide the bubble to the surface. If that doesn’t burst your bubble, nothing will.
Some manufacturers say the resin is dry to the touch in one hour. The best advice, though, is to not touch it for at least 24 hours. If the resin isn’t completely dry, you’ll likely leave a fingerprint. After the resin is completely cured, it’s relatively tough and can even resist mild scratching.
It’s usually safe to ship doming liquid to your customers after 24 hours. However, you may want to play it safe, and wait 48 hours. Given the type of doming liquid, and myriad factors, such as curing temperature, humidity and the amount of liquid applied, full curing requires up to a week. Quite simply, more liquid requires a longer curing period.
Application is simple for domed, one-part emblems. Simply remove the release liner and stick it in place. If your graphics comprise numerous letters or graphics elements, you must transfer the domed graphics with a film application tape. Suitable tapes vary. Ask your sign-supply distributor for an application tape recommendation.
Consider the tape’s tack level (does the tape have enough grabbing power to transfer the graphics?), whether the adhesive delaminates from the tape’s backing and, most importantly, whether the tape leaves an impression on the domed part’s surface. With application tape, make sure the part is completely cured before you mask it.
To Dome or Not to Dome.
Doming is like any product. In deciding whether or not to pursue this as an offering in your product and service portfolio, here what you should consider:
- Will the demand for the product in your market justify your investment in tools and resin?
- How much effort and expense is required to promote the product?
- What is your likely return on your investment?
To estimate, calculate how much resin you’ll need, vinyl costs, how many parts will be lost during production (your scrap rate) and job duration. The $10 resin cartridges are often sold in packs of 10. Resin purchased in bulk can cut costs by as much as 75%. That makes cartridges seem quite expensive. But, if you only dome graphics occasionally, the convenience is worth the added cost.
To estimate, you need to determine the size of the part to be domed. A resin cartridge can cover approximately 50 sq. in. You also need to factor in the job’s scrap rate. Even if you’re good at doming, your scrap rate can be as high as 15%. To play it safe, factor in at least 25%. And finally, you need to add the cost of any unused material. Here’s why. Doming resin has a shelf life and it may go bad if you don’t have doming customers standing in line at your door.


