A final application of paste wax is a popular way put a shine on a dull finish. Using a colored paste wax is also effective in disguising any imperfections on the surface of a woodcarving or on a piece of furniture. You can apply paste wax over a variety of other finishes, including varnish, shellac and drying oils, such as tung oil or boiled linseed oil. Woodcarvers will also apply paste wax directly onto raw wood.
| Softer waxes are easier to apply and buff to a much glossier finish than harder waxes. Carnuba wax is the toughest wax that you can use. It provides the maximum protection for a wax finish, but it requires more work to apply and it is less glossier than other waxes. |
The preference of old time woodworkers was beeswax. And if you are a real traditionalist, you would make your own paste wax, which is not that difficult to do. Just because the old timers chose beeswax doesn’t make it the best paste wax. In fact, some would argue that synthetic paraffin wax produces a higher gloss level. Years ago, beeswax was most widely used because it was the most readily available.
Times are different now. Today you have a selection of paste waxes that include beeswax, paraffin and carnauba waxes, along with blends one wax with another.
In this article I will provide some tips on applying paste wax, as well as explain how to make paste wax from scratch.
Commercial paste waxes sold in a can at your local hardware store are a combination of wax and a solvent. Some waxes are sold in colors for antiquing purposes. These colored waxes are also useful in covering up any nicks and scratches in the wood. I recommend trying Liberon’s Black Bison brand of furniture waxes, which is available in a variety of colors. You can use a couple of different colors to create some interesting effects.
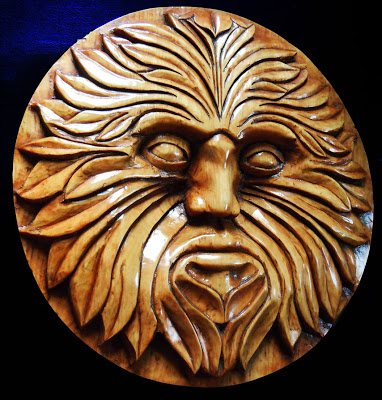
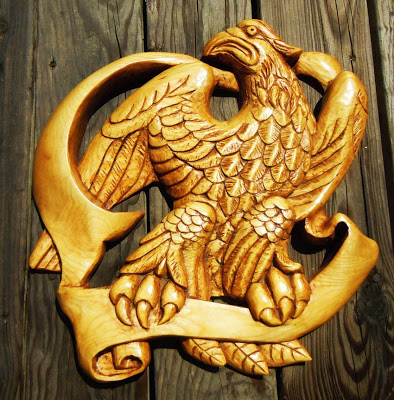
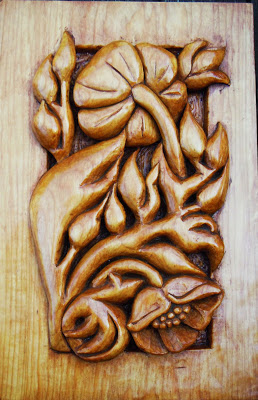
| Using a black antiquing wax or dark color patinating wax can accentuate the grain of the wood and the darker recesses and surface texture of the carving. This creates a more dramatic contrast between the highlight and shadow areas of the work. Be aware, though, that the darker waxes will also accentuate any tooling marks and flaws in the wood. |
If you can’t find a colored wax in a store, you can very easily make your own. Most clear paste wax sold in a can will melt at approximately 150⁰F (66⁰C). To melt the wax, scoop out a desired amount into a clean tin can or glass jar. Place the can in a slow cooker or double boiler filled with water. Turn the heat on low or medium and wait for the paste wax to melt. Do not attempt to melt the wax over an open flame. Remember that paste wax is comprised of solvent, which is flammable. The flame from a gas stove can very easily ignite the solvents.
After the wax has melted, gradually add some Japan paint or artists’ oil paints into the wax until you achieve the desired color.

Application. To wax a surface, scoop out a couple of tablespoons of paste wax and put the wax in the center of a clean, lint-free cotton rag. An eight-inch square piece of an old tee-shirt works great for this purpose. Or you can use a six-inch piece of the toe portion of an old athletic sock.
Wrap the rag around the lump of wax. The wax will seep through the weave of the cloth. The purpose of using this technique is that it applies only a very thin coating of wax. When waxing, more is definitely not better. Excessive wax must be removed from the surface by buffing with a clean rag or with a natural hair bristle furniture brush. Controlling the amount of wax applied will save time and effort.
Rub the wax in a circular motion over the surface. After applying a thin coating of wax, allow it to cure to a dull finish. During this time, the solvent in the wax will evaporate in a few hours. The rate of evaporation depends on the type of solvent used in the paste wax and the ambient temperature in your shop. In colder temperatures, the solvent will take longer to evaporate. To allow enough time for evaporation, some woodworkers will wait until the next day to remove the excess wax.

| After applying the wax with a rag, wipe off the excess. After waiting 20 to 30 minutes, brush the surface with a natural bristle brush. The brush helps further remove any excess wax and more evenly distributes the wax of the surface of the wood. The objective is to achieve a very thin coating and avoid a heavy wax build up. After burnishing the waxed wood with my furniture brush, I buff the wax with a pad of cloth to a glossy finish. |
Wax removal. With a clean, lint-free rag rub the surface to remove any excess wax build up. To facilitate removal of the excess wax, you can heat the surface of the wood with a hair dryer or electric heat gun to soften the wax. Easy does it on the heat so you don’t scorch the surface.
Buff the surface to a shiny finish. To buff up the finish, you can use a microfiber cloth used for car detailing. Or to save time you can use a buffing attachment for a drill.
If the surface does not shine up to the desired finish, you can always apply a second coat. To maintain the finish, reapply the paste wax every six to twelve months.
Paste Wax from Scratch. Making your own paste wax is relatively simple. All you need is a cheese grater, a solvent, such as turpentine or mineral spirits, a block of beeswax and an electric heat source.
- First shred the beeswax with a cheese grater.
- Put the shredded wax into a glass jar.
- Optional: to make a harder paste wax, you can add a little (2 to 3%) of carnauba wax to the total amount. Carnauba wax is much harder than beeswax, having a melting point of about 180⁰ F (82⁰C). The softer beeswax, on the other hand, melts at 150⁰F (66⁰C).
- Place the jar into a double-boiler or crock pot with a couple of inches of water. Turn on the heat (low to medium) and wait for the wax to melt. Turn off the heat, if the water boils. After the mixture dissolves, stir it with a craft stick.
- Allow the mixture to cool. The consistency should be that of Crisco.
- To adjust the consistency of the paste wax, reheat the mixture and add more wax to harden it. For softer mixtures, add more solvent.
Conclusion. In itself, paste wax provides very little protection against water damage, UV light or abrasion. But used in conjunction with other finishes, it can enhance the coloration of the carving and polish the surface of the wood to a glossy, appealing appearance.


