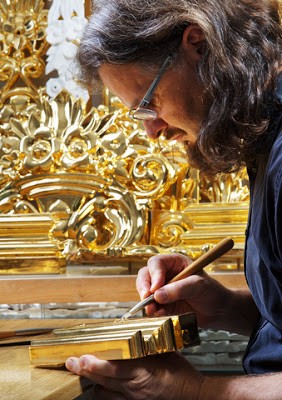
While you might have experience in oil gilding exterior signage or water gilding on glass, you may never have attempted traditional water gilding, or what is also called bole gilding. This technique is used for interior applications, primarily gilding wood picture frames. The process involves coating the wood with several layers of gesso and clay bole. After the bole is applied, its surface is rewet with what is called gilder’s liquor, and gold is applied onto the object. The final step in this time-consuming process is burnishing or polishing the gilded surface to a brilliant finish.
Because traditional water gilding is labor intensive and requires additional material and special skills, it is much more expensive process than surface gilding with oil size. The quality of the gild, however, is worth the additional expense, if you are trying to achieve the most brilliant and most highly polished gild possible.
Background. Dating back several hundreds of years ago, artists and craftsmen of the Renaissance used the bole gilding to apply gold to paintings, statuary and furniture. With the rise of the guilds during this period, specialized gilding trades developed. These specialists included gold beaters, who pounded gold into leaf material, and frame gilders, who decorated the moldings of picture frames.
Since many furniture makers also made picture frames, the practice of gilding decorative motifs, was soon adopted to embellish furniture and architectural elements. Passed down from one generation to another, the water gilding process has essentially remained the same for hundreds of years.
Tools of the Gilder’s Trade
Equipment & Materials. Most of the tools are the same ones used for gilding in the sign industry. Some of the materials used in traditional water gilding, however, are quite different. Below is a list of equipment and supplies that you will need:
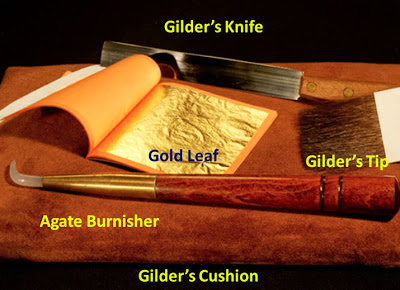
- Gilder’s Tip – Gilders use a special brush called a gilder’s tip to transfer pieces of gold leaf from the gilder’s cushion to the substrate.
- Gilder’s Knife – A gilder’s knife features a long, flat blade used to cut the gold leaf into pieces. It should be sharp and smooth enough to cut the gold without snagging or tearing the leaf. Is a special knife absolutely necessary for cutting gold leaf into sections? Probably not. But it’s nice to have. You could probably get away with using a pocket knife or a table knife, but it must be sharp and without any burrs that will tear the leaf. Some of the old time gilders would allow their finger nail of either their pinky finger or index finger to grow long, and would use it to cut the gold. It works good enough, just as long as you don’t have a hang nail.
- Gilder’s Cushion – Consisting of a wooden board covered with suede leather, the gilder’s cushion holds the gold leaf in place as it is cut with a gilder’s knife. Many commercial gilder’s cushions have a wind screen that prevents unexpected breezes from blowing the gold leaf away.
- Polishing Stone – In the Middle Ages, gilders used a polishing stone called a “dog’s tooth” to burnish gold. The tool was given this name because originally the gilders used the canine tooth of animals, such as dogs and hogs, for polishing gold. The smooth surface of the animal tooth did a good job of polishing. The dog’s tooth had one shortcoming. It was prone to breakage. Today, agate polishing stones have replaced the dog’s tooth. Agates are very smooth, flexible, and most importantly, durable. Available in a variety of shapes, the agate is joined to a wooden handle with a metal ferrule.
- Hog bristle brushes – Available in a variety of sizes and shapes, such as fitches, filberts and flats, bristle brushes are used to coat the gesso and bole onto the surface to be gilded.
- Mop brush – A bushy round-shaped squirrel hair brush used to apply gilder’s liquor to the bole, rewetting the surface before laying gold leaf. Also used to tamp gold leaf into hard to get at crevices as well as to brush away excess gold leaf.
- Horsehair cloth – Used to polish the bole to a smooth finish before gilding.
- Double boiler or crock pot – Used to heat rabbit skin glue and gesso mixture.
- Digital measuring scale – When you are following a recipe, pay close attention to whether the ingredients should be measured by weight or my volume. Digital scales are inexpensive, and are worth the money for accurately measuring solid ingredients by weight.
- Kitchen measuring cups and spoons – You will need an assortment of kitchen measuring cups and spoons to measure ingredients by volume. Liquids are usually measured by volume. Dry ingredients are usually (but not always) measured by weight, requiring a scale.
- Flour sifter or metal sieve – Have you made gravy before? Nothing’s worse than lumpy gravy. The same holds true for gesso. To prevent lumps in your gesso, add the whiting using a sifter or a metal sieve.
Raw Materials.
- Rabbit Skin Glue (RSG) – Rabbit skin glue has the longest straight molecular chain of any glue. This property makes it very elastic. Because of its flexibility, rabbit skin glue is tremendously strong. It bends but doesn’t break. Available in pellets, granules, and sheet, the RSG is mixed with water and heated to a temperature between 98.6° F to 120° F. Don’t overheat the glue mixture or you will ruin its adhesive properties. (NOTE: Animal hide glue is not the same thing as RSG. Hide glue is too brittle and will crack as the wood expands and contracts.)
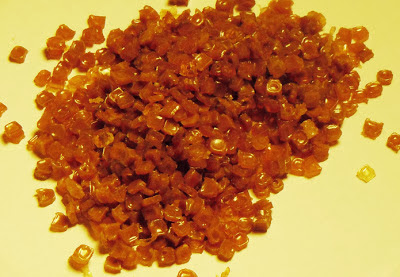
Rabbit Skin Glue is very flexible and strong. It is not the same thing as animal hide glue.
- Whiting – In making gesso, whiting, which is ground up limestone or chalk, is mixed with rabbit skin glue.
- Distilled water – Tap water contains minerals that can discolor the gold leaf. When mixing rabbit skin glue, clay bole and gilder’s liquor, always use distilled water.
- Sieves & Paint Strainers – After mixing and heating the gesso, it is important to strain the mixture to remove any lumps. Paint strainers from your local hardware store are OK. Fine sieves, which you can buy at a culinary store, work better.
- Bole – Available in a variety of colors, bole is clay coated in very thin layer on top of the gesso. The color that you select is critical, because it tone the gold leaf, which is applied on top of it.
- Gilder’s Liquor – A mixture of distilled water, denatured alcohol and a little rabbit skin glue. This mixture is the size used in water gilding. Some gilder’s use grain alcohol as an alternative for denatured alcohol. You can also use isopropyl alcohol. If you are making shellac from dry flakes, you can also buy nearly pure denatured alcohol. Their denatured alcohol is 99.5% ethanol and .5% denaturant, which makes the liquor undrinkable.
- Gold Leaf. Very thin sheets of gold are generally sold in booklets of 25 pieces. The purity of the gold is measured in karats. Pure gold is 24 karats. Other metals, such as copper and silver are added to the real gold to alter its physical properties, such as coloration and hardness. The addition of copper, for example, can impart a warmer reddish hue to the gold. With the addition of silver, the appearance of the gold becomes more pale. Much of the gold leaf sold to gilders is 23 ½ or 23 karats. 23XX deep gold is what is normally sold. There is, however, 23XXX gold, which is slightly thicker. Lemon gold, which is a popular choice for water gilding glass, is about 18 karats. Even lighter in color is pale gold, which is approximately 16 karats. The lightest color of gold leaf is white gold, which is about 12 karats (comprised of 50% gold and 50% silver).
- Vasoline or Chap Stick. Sign makers have traditionally rubbed either Vasoline petroleum jelly or Vasoline Intensive Care onto their forearms, and by brushing the hairs of the gilder’s tip over the ointment, the brush hairs becomes tacky enough to pick up and transfer gold leaf to the substrate. As an alternative to the Vasoline products, Dr. Francis Lestingi recommends Chap Stick. You can also brush the gilder’s tip over your hair. Purists recommend neither technique. If you want the least amount of oily contamination on your gold, you can charge the brush by pulling the hairs between your cheek and the back of your hand.
Surface preparation. Done correctly, the gilded work of art assumes the appearance of a solid gold object. The key to attaining the desired level of perfection is proper prior preparation.
Some woods are well suited for water gilding. Others are not and should be avoided. If you do any wood carving, you are probably very familiar with basswood. This is a very soft wood, with a very fine grain providing a smooth finished surface, after it is sanded with a fine grit paper.
Typically basswood also does not contain oils, which can bleed through the layers of gesso and bole, discoloring the gild. Woods, such as pine, contain oils, which are very problematic and, for all practical purposes, make them unsuitable. Oils and sap in the wood, will not only bloom to the surface, discoloring the gold, but can also cause the gesso to delaminate from the wood.
Prior to the application of gesso, you should fill any nail holes and dings in the wood. Jill London of the Society of Gilders who teaches traditional water gilding, recommends Durham’s Rock Hard Water Putty. The putty, which comes in powdered form, is mixed with water to form a paste. Don’t mix the wood putty too thin. It should have some body to it. An important feature of the putty is that it dries fast – really fast. The advantage is that you don’t have to wait very long after applying it to sand it.
The saying is that you can’t judge a book by its cover. The same holds true for judging a product by its packaging. The design on the can of Durham’s Rock Hard Water Putty is flat out cheesy and out of date. But what’s in the can has stood the test of time – since the Depression.
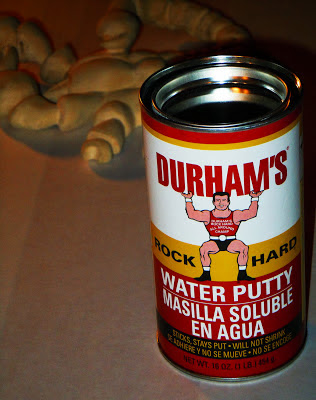
Durhan’s Water Putty bonds well to wood, dries rock hard and does not shrink, even years after it has been applied
Durham’s Water Putty is a gypsum-based powder, which is mixed with water and used as a wood filler. When the water putty hardens, it becomes, as the name on the packaging suggests, “rock hard”. Work fast when using this product, because it cures in short order.
One reason that craftsmen swear by this product, is that bonds to wood like white on rice and doesn’t shrink, even years after it has been applied. This makes it perfect for filling holes, gouge marks and cracks in picture frames, antique furniture, and wood carvings.
When you work with Durham’s Water Putty, only mix a small amount that you use within five to ten minutes. Since the water putty will harden rock hard, you may want to mix it in a clean tin can that you can toss in the garbage when you are done.
The directions on the can indicate that you should add one part of distilled water at room temperature to three parts of the powder. This will produce a putty with the consistency of bread dough. You can mix the water putty so that it is a little juicier – to the consistency of sour cream.
Whatever you do, don’t use hot water to mix up a batch of putty. The heat of the water will accelerate the curing time, resulting in the putty hardening, before you have a chance to use it.
Be sure to keep your greasy, grubby paws off of the wood or you could contaminate the surface, compromising the adhesion of the water putty to the substrate.
You can use a craft stick or putty knife apply the putty, or you can use your fingers. After you press the putty into the nail holes or cracks and crevices in the surface of the wood, wait about twenty to forty minutes for it to set up. Small nail holes, should be ready to sand within this time. If you have filled a bigger hole with the putty, you will probably have to wait anywhere from four hours to a day before sanding. Be sure to wear a dust mask and safety glasses and work in a well-ventilated area, when sanding.
If you keep a tight lid on the powder, Durham’s Water Putty will be good to use for years.
After filling in any holes, sand the wood with a 150 grit sandpaper and wipe the surface clean with a tack cloth. Sanding serves two functions. Not only does it smooth the surface of the substrate, it also helps to raise the grain of the wood, which gives the substrate some tooth for the gesso to adhere to.
Preparing the Rabbit Skin Glue. In its dry state rabbit skin glue is dehydrated glue. To rehydrate the glue you must add water at a ratio of 10 parts of water to 1 part glue. Below is the basic recipe, that Jill London and many other gilders recommend:
Recipe for Rabbit Skin Glue.
- In a clean glass canning jar with a lid add 28 grams of rabbit skin granules or pellets by weight. (Note: 28 grams equals one ounce.)
- Add 10 ounces (or 1-¼ cups by volume) of distilled water to the glue, and cover the jar to prevent any contamination.
- Wait at least 2 to 3 hours for the rabbit skin glue to absorb the water. Better yet, mix the RSG and water the day before you intend to use it and allow it to soak over night.
- Before heating the glue, strain the mixture using a kitchen strainer.
- In a double boiler, heat the glue/water mixture to a temperature between 98.6°F and 110° F. Carefully monitor the temperature using a candy thermometer. You can also monitor the temperature of the water with your hand. The water should feel warm. If the water is too hot to put your hand in it, it is too hot for the glue. Excessively high temperatures above 120˚F will destroy the adhesive properties of the glue. Continue to heat the glue until all of the granules have dissolved and disappear. If you overheat the glue, throw it away and start over.
Note: you can store the 10:1 RSG mixture in a refrigerator for up to two weeks. After that, the glue will decompose and spoil.
Sealing or Sizing the Wood. After sanding, you need to brush on a thinned coating of the rabbit skin glue, at a ratio of 20 parts of water to 1 part RSG. Take one part of the 10:1 RSG and mix it with one part distilled water. This will give you a 20:1 RSG mixture.
Before dipping your brush in the RSG mixture, wet it and squeeze out the moisture between your thumb and forefinger. Do not pull on the hairs of the brush, or you could pull them out. Liberally coat the surface of the wood with the 20:1 mixture. This coating will raise the grain of the wood, giving it some texture for the glue to grab onto. This is an important step that ensure good adhesion of the gesso to the wood substrate. If any part of the frame was not sized, you could experience delamination of the gesso from the wood.
Some people have the misconception that the glue forms a barrier preventing the transmission of moisture between the wood and the layers of gesso and clay on top of it. Not at all. Instead the water-based coating of sealer allows the wood to expand and contract as it gains or loses moisture.
Some gilders will brush on a second thin layer of the 20:1 rabbit skin glue, applied about twenty minutes after the first coating. The application of the second coating of glue helps fill in some of the grain, if you are working with open grained woods, such as oak and walnut.
The light layers of glue also help bind the subsequent layers of gesso the wood. For smooth surfaces, you can use a bristle brush, such as a flat or a fitch. Or you can use a sable brush. If you are applying the glue to irregular crevices on the frame, a filbert may help getting into the tight spots.
Selecting the type of wood is important, because a smooth, even grained wood serves as a good base or footing for the foundation of gesso, which is applied over it.
Gesso. After you have sanded and sealed the wood, keep your grubby paws off of the substrate as much as possible. Oils from your skin can contaminate the surface, preventing good adhesion of the gesso to the sealed wood.
As smooth as the carved wood surface may be, it most likely has tiny imperfections. Left uncorrected, any imperfections, regardless of how minute they may be, will be magnified, after highly polished gold is applied. One function that the gesso serves is to fill in the chips, cracks and other defects, providing a smooth surface for subsequent layers.
The main ingredient used in preparing the gesso layer is calcium carbonate (CaCO3 ), which is found naturally in limestone, chalk and ground up sea shells. If you have ever used whiting, that is calcium carbonate. The calcium carbonate is mixed with a binder, such as rabbit skin glue. When you are buying whiting, caveat emptor (buyer beware). Not all whiting is the same. The grit of the product will vary from one part of the world to another. To ensure that you are buying the type of whiting that you will need for this type of gilding, buy from a gilding supplier, such as Wehrung & Billmeier .
When working on wood, rabbit skin glue is typically used as the binder. It, however, is not the only glue that is used. When gilding a manuscript, fish eye glue was often used, because it was more flexible. Another binder was parchment glue, which was made by cutting parchment into little bits and boiling the pieces.
To build up a perfectly smooth surface, several layers of this mixture are liberally applied with a brush.
In addition to the calcium carbonate and rabbit hide glue, other components are added to the mixture. The addition of linseed oil, for example, can improve the flow out of the gesso, yielding a smoother surface.
While gesso will fill in the pores on the surface of the wood, it does not seal the wood. Rather, since the gesso is hygroscopic, it allows the wood to absorb and release humidity as the atmosphere changes. This lets the wood expand and contract naturally. Although the gesso expands and contract at the same rate as the wood, the gesso is not flexible material. Cracking of the gesso at the corner joints is common. For this reason, fabric material is often applied over the joints to prevent cracking.
During the very best of conditions, it can take days for the gesso to completely dry. High relative humidity can prolong the process extending the drying period to weeks.
After the gesso is completely dry, the next step in the water gilding process is to apply the bole, which is a type of clay. It is available in many different colors. These include red, yellow and blue. The color of the clay is important. The reason is that real gold leaf is somewhat translucent. The color of the bole to which the leaf is applied, will impart a cast to the gold. Yellow clay will enhance the true color of the gold. Red clay, on the other hand, will give the make the gold appear warmer.
Gesso combines a filler, which is the calcium carbonate, with a binder, which is the rabbit skin glue. The strength of the gesso is directly related to the ratio of the filler to the binder. That ratio is very important to how the gesso performs. If too much filler comprises the mixture, the binder cannot hold the mixture together and the gesso can crumble when pressure is applied to it. If the mixture has too much binder, the gesso becomes too hard. When this happens the gesso can shrink and crack and can break away from the wood.
The ratio of rabbit skin glue to whiting is critical in determining the hardness of the gesso. The more glue that you add to the mixture, the harder the gesso will become. As you add more whiting, the gesso becomes softer. If the gesso is too soft, it can crumble under pressure. The harder the gesso is, the more brilliant the burnish can be. So why not mix the strongest gesso you can? One problem is that the harder the gesso is, the more difficult and time consuming it is to sand. Even worse, if the gesso is too hard, it can become brittle and potentially can crack.
The amount of water in the gesso mixture does not affect its hardness. It does, however, determine the viscosity of the gesso. Thin mixtures are easier to brush, and yield a smoother finish surface with less brush marks. The disadvantage is that you will need to apply more layers of these thin coatings to achieve the desired thickness.
Thick mixtures require fewer layers of gesso. If the gesso is too thick, you will produce brush marks. If you see brush marks as you are coating the gesso, you should thin the mixture with distilled water.
As mentioned earlier, coatings are applied wet on wet. Subsequent layers are applied to previous ones before the gesso dries. If the gesso dries before you coating the next layer, you can rewet or dampen the surface with a wet sponge.
Because the ratios of the various components are very important, follow any of the recipes to the letter when you are starting out. You can always vary the recipes, after you have experience under your belt. When you are mixing the components of the recipes all dry ingredients are measured by weight; all liquid ingredients are measured by volume. That means that you will need an accurate digital scale and graduated glass measuring cups.
The recipes below are adapted from An Introduction to Water Gilding by Marty Horowitz and Lou Tilmont, Second Edition. 2007. Their book is essential reading for anyone serious about water gilding.
Recipe for Gesso
- Remove the glue mixture in the above recipe from the double boiler. To this mixture gradually add 1.5 cups of whiting. To prevent lumps, use a flour sifter to add the whiting. By sifting the whiting you will prevent lumps. Using a wooden spoon slowly stir the mixture until the ingredients are completely combined, taking care not to form bubbles. Bubbles in the mixture can result in pinholes in the gesso. Vigorous stirring as you are heating the mixture will generate bubbles in the gesso. Bubbles in the mixture quite often result in pinholes after the gesso dries on the substrate. To prevent the creation of bubbles, gently stir the mixture.
- On top of the glue/whiting mixture, add 1 tablespoon of denatured alcohol and ½ teaspoon of boiled linseed oil. Allow the glue/whiting mixture to rest for one hour. The alcohol and linseed oil will help dissipate any bubbles which have formed.
- After the resting period, strain the mixture twice through a paint strainer.
If you want to make sure that the gesso is neither too hard nor too soft, follow the recipe exactly. Will any one recipe be perfect for every working environment? Probably not. Differences in humidity and shop temperature may require that you modify the recipe to satisfy your unique requirements.
Apply the gesso while it is still warm, this will ensure good flow out. Some gilders recommend the addition of boiled linseed oil the gesso to improve the flow of the gesso and ensure a smooth coating. Other gilders recommend against it, believing that the oil contaminates the mixture, potentially compromising the adhesion of the gesso to the wood.
Different types of brushes are used to apply the gesso to the wooden substrate. If you are applying the mixture to the intricately carved detail, you will want to use a stiff bristle brush, such as a fitch or a filbert. On the other hand, you should use a sable brush or a quill to apply the gesso to the flat smooth surfaces of your carving or picture frame.
In applying the first couple of coatings, you should brush thick coating of the gesso. That being said, don’t lay it on too thick allowing the gesso to puddle in the crevices.
Typically six to eight coatings of gesso are applied to the wood frame or carving. After you apply the initial coating of gesso, you should apply each subsequent coating before the previous coating is completely dry. This practice ensures good intercoat adhesion between layers of coating.
Sanding the Gesso. After you have coated the wood with gesso and have allowed to it dry thoroughly, you should sand it. Any imperfections in the surface will often result in imperfections in the subsequent layers of clay. In turn, these imperfections will glaringly show up when you lay the leaf.
In sanding the gesso, you will typically use with 400-grit wet/dry sandpaper. In using the sandpaper dry, this very fine grit will gradually level and smooth the surface of the gesso. Most beginners will want to sand dry. While dry sanding can be a slow process, you are less likely to cut through the gesso and sand right down to the wood. As you sand the wood, don’t over handle the surface, because you could potentially contaminate the gesso with skin oils. Some gilder’s will hold the piece that they work on with clean toweling or wear a clean cotton glove.
As you become more experienced, you may want to try wet sanding. This is a much faster process, but requires extra care so you don’t pull the gesso off of the surface. After soaking the wet/dry paper in water, lightly sand the surface.
When you are finished the surface should be as smooth as silk. Carefully inspect the surface for any imperfections. Because your sense of touch is much more acute than your eyesight, rub your fingers over the sanded gesso to find any rough spots. Also look for any other defects, such as pinholes.
Bole. After several coatings of gesso are applied, several layers of bole, which is a very fine clay mixed with rabbit skin glue and distilled water, are coated onto the substrate. Bole is available in a variety of colors, including yellow, red, green, blue, black and grey. You can also mix different colors of clay to create your own colors.
Bole is available as either dry cone clay or as a wet medium. The recipe below uses the wet clay.
Bole Recipe
- Combine the following ingredients:
- 1 Tablespoon of wet clay medium
- 3 Tablespoons of distilled water
- 2 Tablespoons of 10:1 RSG
- Thoroughly mix the ingredients until the clay has dissolved. Then strain the bole through a sieve to catch any lumps.
While gesso is a very thick coating, that is applied wet on wet, the bole is very thin, water mixture that is applied wet on dry. If you lay on the bole before the previous coating is completely dry, the thick deposit of wet clay could mud crack after it dries.
The Water Gilding Process. Applying the multiple layers of gesso and bole is time-consuming, but the process is not difficult to learn. The really tricky part is laying the leaf. If you have done any water gilding on glass, you should have no problem. Newbees, on the other hand, will have to experience a challenging learning curve as they develop the dexterity needed to lay gold.
Before you can start laying leaf, you will need to prepare the Gilder’s Liquor. It’s called a liquor, because the old timers used gin in their recipes. Today’s concoctions call for isopropyl alcohol. The recipe that Jill London recommends is given below:
- In the bottom of a small jar, pour ¼” of warm distilled water.
- Add a piece of prepared rabbit skin glue about the size of a pea to the water. Wait for it to dissolve.
- Add ½ cup of cold distilled water and a ¼ cup of isopropyl alcohol to the jar.
While there are several different types of gold leaf, your best choice for traditional water gilding is XX 23 karat leaf. In gilding will need to cut the gold leaf into workable pieces. Check you gilder’s knife for any burrs that could snag the leaf. Then, using alcohol, wipe the blade clean of any oils.
Beginning at the back of the book, place a piece of matte board behind the rouge paper supporting the last sheet of gold leaf in the book. Then cut the gold leaf to the size needed with your knife.
To reactivate the rabbit skin glue in the bole, you will need to wet the surface with gilder’s liquor. Using a gilder’s brush, wet the surface to be gilded with the liquor, brushing the area several times.
With the surface wet, transfer the leaf with your gilder’s tip. To pick up the piece of gold, charge your gilder’s tip with the skin oils of your face. Then lay the tip of the hairs of the brush on the piece of gold. Wiggling the gilder’s tip slightly from side to side can help secure the leaf to the brush hairs.
You will remember that I intimated that this process takes a little dexterity. The snapping motion of your wrist that you will have to master approximates a swinging door.
Did you see the movie “Hitch”? The kissing lesson that Hitch, played by Will Smith, teaches Albert (Kevin James) best describes the how you should lay leaf. If you are going to kiss your date, Smith tells James to go 90% of the distance and let her go the remaining 10%.
The same advice applies to water gilding. Swing the tip of the brush almost all the way to the wet surface. As the gold on the gilder’s tip comes close to the wet surface, the water will attract the leaf for a clean transfer. At least, that’s the way the process is supposed to work.
In the real world, the gold will occasionally transfer with rips in the leaf. Not to worry. Just cut a piece of gold and apply it over the rip.
Burnishing the Gild. In the sign industry, we usually misuse the term “burnish.” To the purists in the gilding field, brushing the surface of gold leaf or rubbing it with cotton is not burnishing. Here’s why. In traditional water gilding, burnishing is synonymous with polishing. This isn’t at all what we do in oil gilding an outdoor sign. Rather every time we rub or brush the surface, we put tiny scratches on it, actually dulling the brilliance of the gold.
Burnishing in the traditional water gilding process is completely different. Using an agate, the surface of the gold is burnished. Burnishing serves two functions in water gilding. First, it enhances the brilliance of the gold. Second, by pressing on the gold with the agate burnisher, you press the gold into the clay improving its adhesion to the surface.
While many people believe that the burnishing polishes the gold, you are actually polishing the clay bole underneath the gold. As the finish or texture of the bole becomes smoother and more polished, the gold mirrors the texture of the bole underneath it.
Surface Finishes. When have finished burnishing, the gilded object should look like a solid gold. After all the effort that goes into making something absolutely brilliant, why would you want to distress or antique it? In some cases, that’s exactly the look that people want to achieve.
Antiquing taken to the extreme can include scratches, gouge marks, fly specks and even worm holes. All of this in an effect to make something bright, shiny and new look centuries old. In less extreme cases, you may want to simply tone down the brilliance of the gild in some areas to add some shading.
Conclusion. There are several approaches to learning this very traditional method of gilding. You can follow the step-by-step procedures in this article, which will get you started. Much of your learning, however, will be through trial and error. Mostly error.
If you want to accelerate your learning curve, you can also take a course. The Society of Gilders (SOG) offers a course on traditional water gilding as well as courses on many other gilding techniques. This year the SOG will hold classes in New Orleans concurrently with the restoration and regilding project at St. Alphonsus Church and St. Mary’s Assumption. If you are a gilder, or interested in learning about gilding, this is an opportunity to join other skilled craftsmen for a week-long celebration of the gilding arts.


