In the sign industry, Western Red Cedar sign blanks are a popular choice because this affordably-priced wood is dimensionally stable and resists insects and decay. As a substrate for exterior signage, cedar can provide up to thirty years outdoor durability.
Its workability also makes Western Red Cedar an excellent choice for sign makers. Because it is a soft wood, even a novice craftsman can easily carve incised letters in it. However, carving more intricate designs is usually more challenging. Although the wood is soft, it is also very brittle wood and will chip or tear out very easily. But with a little practice and by using sharp tools and proper carving technique, Western Red Cedar will hold moderate detail as shown in the photograph below.

With a sharp gouge and good technique, Western Red Cedar will hold moderate detail.
- When carving cedar, here are some tips, which can help you in your next project:
- Your gouges must be razor sharp. Dull blades will tear the wood. Gouges that have a nick on the cutting edge will also mar the surface of the wood leaving a noticeable white scratch in the wood. If your blades are sharp and if you use proper cutting technique, the wood should have a very shiny appearance as you are carving. Conversely, the surface of the wood will appear dull and in some cases rough, if you carve with a dull gouge or are cutting against the grain.
- Be mindful of the grain direction when carving. The good news is that Western Red Cedar has a very straight grain. But if the blade of the gouge goes against the grain, the wood will tear or chip easily, as previously stated. When you are carving an intricate design, use very shallow cuts, shaving the surface of the wood. If the wood starts to tear out, stop immediately and change the direction of the cut.
- Never use a stop cut. Many woodcarvers will outline their designs using what is called a “stop cut”. Using a gouge or chisel with a mallet, a cut is made straight down into the wood, perpendicularly piercing across the fibers of the wood. With some hardwoods this can give you a very nice clean edge on the perimeter of the design. Because Western Red Cedar is a very brittle and fibrous wood, stop cuts will crush the fibers of the wood, causing them to separate or split. Although some woods will not split when using a stop cut, it is best to avoid this practice all together.
- As you are carving with a gouge, twist the handle of the tool so the edge of the blade rolls away from the remaining wood. If the blade digs into the wood, reverse the direction of how you are twisting the handle. Slightly rolling the handle of the gouge as you are carving is a good habit to develop as you are learning to carve.
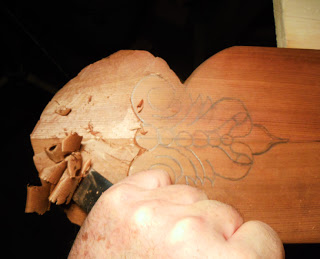
As I rough out my design, I am carving at a 45⁰ angle to the grain of the wood. This gives me a very nice smooth cut.
- When carving an intricate design, the best advice is to use a harder wood with a tight grain, such as mahogany.

Completed sign after priming, painting and gilding.


