If you are a sign maker and have a plotter or printer, garment decorating with heat transfer films is one of those prize opportunities that requires a very short learning curve and an investment in a heat press. The cost for a good clamshell press runs about $1000 to $1200, but you can buy one for as little as $300 to $500. Just remember that you get what you pay for.

Be sure to check blade depth. As a rule of thumb, it should be set at about half of the thickness of a credit card.
Heat transfer materials are comprised of either polyurethane, vinyl or flock facestocks coated with a heat-activated adhesive, and laminated to a plastic release liner or carrier film. The construction of flex and flock films for plotter cutting consists of an adhesive coated carrier as the bottom layer, and the film as the middle layer, with the heat-activated adhesive on the top. After the graphics are cut in reverse or “wrong reading”, the carrier serves as the application film. This clear film carrier allows the user to accurately position the graphic on the garment. It also prevents misalignment of colors, if you are overlaying multiple colors.
Plotter cutting heat transfer films is a little different than cutting pressure sensitive vinyl. A few of the shops that have tried cutting heat transfer materials have had problems. Some problems have resulted from using a dull blade. Other problems resulted because the blade depth was set incorrectly or the downforce pressure was too high. What’s more, many shops ignore setting the blade offset, after they change from a 45⁰ blade to a 60⁰ blade.
To help remedy these problems, I have compiled a few basic tips and tricks.
Green Side Up. I am sure that you heard the joke about the landscapers that incorrectly installed sod and had to be reminded by their supervisor: “green side up”. Remember that dictum when you are loading heat transfer material in your plotter. Make sure that you are cutting on the film side not the liner side. Because the liner is usually a clear polyester film, which side is which, can be confusing. Many heat transfer films, but not all, are rolled with the liner to the outside. It never hurts to check, using your Xacto knife to peel a little piece of the film on the corner of the material. Polyurethane films are very thin and very easy to cut. Polyester liners, on the other hand, are very difficult to cut. If you have to crank up the down force, you might be cutting on the wrong side.
Selecting the Right Blade. Most polyurethane heat transfer films and flock films cut easily using a standard 45⁰ blade. When cutting thicker flock films, reflective films or a design with very intricate detail, you may need to use a 60⁰ blade. Regardless of the blade angle make sure that the blade is sharp, otherwise don’t expect clean cuts.
Adjusting Blade Depth. One of the first adjustments that you should make in setting up your plotter is setting the blade depth. One popular rule of thumb is to set the depth of the blade so it barely extends past the end of the blade holder at approximately half the depth of a credit card. As far as rules of thumb go, this is a good general rule. While this may work for many applications, don’t expect it to work in all cases. Unfortunately, one setting doesn’t fit all media, because media thickness varies greatly. The thickness of polyurethane films is generally 2 mils, while some brands of flock films can be as thick as 14 mils.
A more precise setting is to adjust the blade to a depth that is at least as great as the thickness of the media that you are cutting. Getting the depth just right without highly specialize equipment can be a frustratingly tedious process of trial and error. It is, nevertheless, absolutely critical whether you are cutting heat transfer films or pressure sensitive films. Setting the blade depth much greater than necessary can result in dulling the blade faster, especially when you are cutting heat transfer material on a polyester carrier. Cutting too deeply into a release liner or carrier can also cause the blade to chatter resulting in a ragged edge of the cut media.
One quick test to determine if the blade is adjusted to the proper depth (prior to installing the blade holder in the plotter) is to perform a manual test cut. This manual test is simply a matter of grasping the blade holder in your hand, and dragging the blade across the media in an upright position, perpendicular to the surface. The blade should cut completely through the film and only slightly score the surface of the carrier or release liner. You should not cut so deeply that you can feel the cut lines on the backside of the carrier. Adjust the blade in its holder according to your test cut results. See Diagram A below. 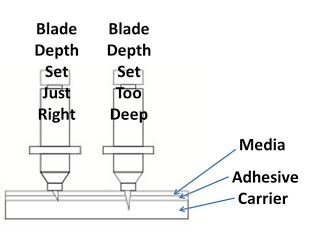
Diagram A.
Adjusting Blade Offset. Blade offset is the distance between the tip of the cutting blade and the center of the blade. This distance will vary depending on the angle of the blade used.
For accurate cuts, especially at the corners, you must adjust your plotter’s offset setting to the manufacturer’s recommendations. In many cases this setting is frequently ignored. Improper settings are not difficult spot. A telltale sign that the offset value is too low is that the outside corners are rounded off. Conversely, if the corners protrude or end in a spike, the value is typically too high.
Downforce. Downforce describes the amount of pressure (generally designated in grams) that is applied to the cutting blade. Cutting polyurethane may take as little as 70 to 80 grams of pressure or less. Generally, much less pressure than you need when cutting pressure sensitive vinyl. Flock films will cut easily too, usually at about 80 to 90 grams.
The ideal setting is to use the least amount of force to accomplish the job. If the plotter is not adequately cutting the media, first check the cutting depth. If that is set properly, adjust the downforce. In many cases the remedy is to decreases not increase the cutting pressure.
Cutting Speed. When plotter cutting heat transfer films, especially when you are cutting polyurethane films, which are very stretchable, or designs with intricate detail, you will most likely need to slow your cutting speed.
Conditioning the Media. Temperature can great affect the layflat stability of the sheet whether the carrier is either film or paper. If you just brought in a roll into your shop from extreme cold, you may need to give it time to come up to temperature before using it.
If the carrier or release liner is paper, humidity is another major factor, because the paper can gain or lose moisture. This can cause the liner to grow or shrink, resulting in curling of the material. For this reason, you may need to condition the media before using it allowing it to adjust and stabilize to your shop environment.
Test Cut. After you load the media in your plotter and before you run a job, do a test cut. Check that the depth of the cut is completely through the media but only lightly scoring the carrier or release liner. Make sure that you cannot feel the cuts on the backside of the carrier. Cutting too deeply is as much of a problem as not cutting deeply enough.
If you are cutting square shapes, one inside another, as part of your test cut protocol, check that the corner cuts are precise. And if you cut concentric circles, see that the lines meet cleanly after the blade makes a full circuit.
Troubleshooting. Plotter problems will occasionally arise. When they do, use the tips in this article to troubleshoot the problem. Through a systematic process of elimination, check the most likely causes. If you can’t solve the problem, ask for help. First, call your distributor. If he can’t answer your questions, he may refer you to the plotter manufacturer or the manufacturer of the heat transfer material.
About the author . . .
Jim Hingst, is a recognized authority in the field of vinyl graphics application. In Vinyl Sign Techniques, Hingst provides a comprehensive guide to the vinyl graphics business. Built around his firsthand experiences working for major fleet graphics screen printers and pressure sensitive manufacturers, Hingst offers a perspective on the vinyl business that thoroughly covers sales and marketing, materials, fabrication, and installation and removal of vinyl products of all kinds. Vinyl Sign Techniques has something for everybody in the vinyl graphics business. Hingst’s book, provides ideas and techniques for graphics fabricators and installers along with advice for executives and salespeople that will result in higher sales and profits.
As seen on hingstssignpost.blogspot.com.


