
The first time that I saw the gilding process, I was visiting the sign shop in Disneyland in Santa Ana, California. The craftsmen were refurbishing the carved wooden horses for a carousel that dated back to the early days in the park’s history. That day they were gilding some of these antique horses, which had recently been repainted.
What is so vivid in my memory was seeing a sheet of gold, hundreds of times thinner than a human hair float in the air. “Gold is actually heavier than lead,” someone said. “A 15” cube of it actually weighs more than a ton.”
That sounds like one for Ripley’s Believe it or Not. For any of you doubters, gold really is heavier. In fact, by volume, gold is nearly twice as heavy as lead. During my trip to Disneyland I had my first lesson in surface gilding, in which gold leaf was applied to a surface coated with an adhesive called gold size.
Preparing the Surface
Before doing any type of gilding, the surface must be clean and smooth. Any imperfections in the surface will be very noticeable. Rough surfaces may require sanding and repainting. How you prep the surface will depend on the type of substrate, its condition and how badly the surface is contaminated. A surface newly painted with lettering enamel is usually ideal, not only because it is clean but the finish is smooth and glossy. Gilding metal may require priming. Prepping older surfaces require the most care, which can include washing with mild detergent and water, solvent cleaning and then finally wiping the surface with isopropyl alcohol.
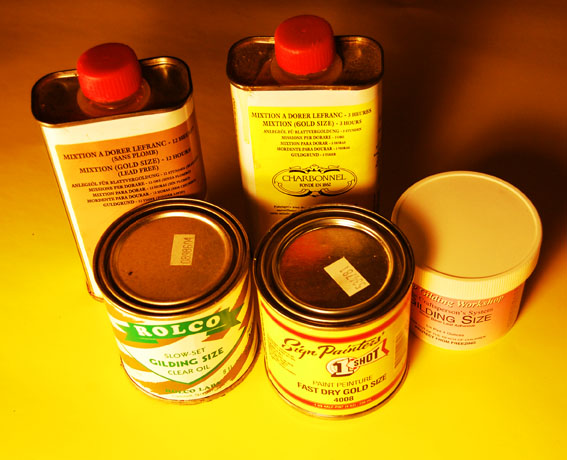
Oil Size.
After the surface is cleaned, an adherent called the gold size is applied to the substrate. In the sign industry, the size, which is usually oil based, is classified either as a fast size or a slow size, depending on how quickly the adherent comes tack.
For applying gold leaf or metal leaf on cars and motorcycles, many sign makers use a fast size, such as 1-Shot #4008 Fast Dry Gold Size and Dux Quick Dry. Depending on the brand, the time at which fast size comes to tack and its open can vary greatly.
“1-Shot size can be ready in as little as 15 minutes, and has a short open time,” says Joe Balabuszko. “Dux is ready anywhere between one hour and an hour and a half. Le Franc takes about four hours and has longest open time for quick size.”
“How fast a size comes to tack and remains open also depends greatly on the temperature and humidity of your work environment”, Balabuszko says. “That’s why it’s important to test how fast the size sets up.”
After you apply the gilding size to your work surface, also apply some to a test panel and write down the time the size was applied. Twenty minutes after applying the fast size, start to check for proper tack. To do this, drag the back of you knuckle against the size. If your knuckle makes a squeaking sound, the sizing is ready for gilding. If the sizing has not sufficiently dried, wait ten minutes and repeat the knuckle test. Keep checking every ten minutes until the size is ready.
Timing is everything. If you apply gold leaf too soon, you can drown the leaf in the size, which will dull the brilliance of the gold. If you wait too long and miss the window of opportunity, the gold leaf will not adhere properly and will flake off.
For outdoor applications, gilders often recommend a slow size, such as Charbonnel’s Le Franc 12 Hour Gold Size. When gilding with real gold leaf, Le Franc slow size produces a much brighter gild than when using the fast size. One reason is that slow size has more time to level out, so its surface is smoother. Slow size also provides you with a longer window of workability that can last up to 20 hours. That gives a sign maker plenty of time to gild a large project or to deal with those inevitable everyday interruptions, which come with running a business.
Before using gold size, you should always strain it through cheesecloth to filter any dried bits of adhesive. After straining the size, many gilders tint it, adding a few drops of imitation gold lettering enamel. If you are gilding on a dark substrate, the tinting will give the size some contrast with the background. Many gilders use the size straight out of the can, never thinning it, because thinning can weaken the bonding strength of the size.
If you are using the 1-Shot Fast Dry Gold Size and plan to clear coat the job with a urethane clear, you should add about 5% to 10% of the 1-Shot #4007 Hardener to the size. The hardener will prevent any adverse reaction, such as wrinkling.
Before applying the gold size to the work surface, Dr. Francis Lestingi of the Society of Gilders recommends dusting the work surface with Shadow Kaolin, a powdered Welch clay. This serves two purposes. As the size is brushed on, the haze disappears so you can easily tell, which areas have been coated and which haven’t. Any missed spots are easy to detect. The kaolin powder also forms a barrier preventing the gold leaf from sticking to any areas of the sign, which does not have size applied to it.
Using an artist’s mop brush dust the surface with the powder to evenly distribute it over the painted surface. Any excess powder should then be vacuumed off, leaving a very fine gray haze on the black painted surface. Using this procedure, very little Kaolin remains – not enough to contaminate the adhesion value of the size.
To apply the size, many gilders use either a lettering quill or a fitch. A lettering quill works great for flat surfaces, because it allows you to precisely apply the size where you want it. If you are gilding a carved or textured surface, you are usually better off using a fitch, such as the “The David Hightower Fitch” by the Andrew Mack & Son Brush Company.
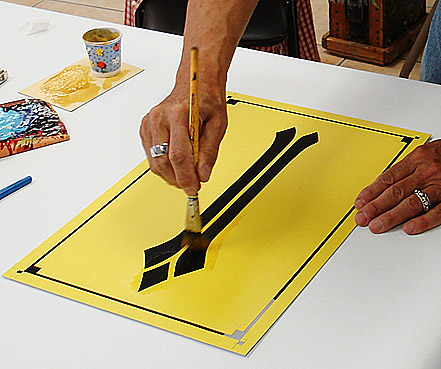
Using a stiff brush, such as a “David Hightower” fitch, brush on the gold size.
Because the head of the fitch is comprised of short hog bristle, the hair is stiffer and consequently does a better job of brushing the size into any tight corners, as well as being better at brushing out any puddling.
For good adhesion of the gold leaf, you only need to apply a single light coat of size. After applying the size, carefully inspecting your work and make sure that the size hasn’t puddled. Any excessive pooling of the size would drown the ultra-thin gold leaf.
About Gold Leaf
Gold leaf is a very thin sheet of real gold, hundreds of times thinner than a sheet of paper. The gold used to make gold leaf is mixed with other metals, either to change some of its physical properties or to alter its colors. 24 karat gold leaf is about 99.9% pure gold. The remaining .1% is typically silver and copper. (A karat is the unit of measure used to describe the purity of the gold. One karat equals 1/24 of the gold content.)
A book of gold leaf contains 25 leaves, each of which is 3-3/8” x 3-3/8”. Each book contains enough gold leaf for you to gild approximately two square feet. Separating the leaves of loose gold leaf are sheets of tissue paper.
If you know any experienced gilders you probably have heard them use terms such as moon gold, lemon gold, and white gold. These are very specific terms, describing specific colors of real gold leaf of different karats. Moon gold is 22k, comprised of 92% gold. Lemon gold is 18k, or 75% gold. White gold is generally 12k consisting of 50% gold and 50% silver. These are just some of the many different gold leaf products available to gilders.
Another gold leaf term that you may have heard is glass gold. This type of high quality gold leaf product exhibits fewer surface imperfections and pinholes and is used for glass gilding. Double gold leaf is a heavier product, being about 10% to 20% thicker than standard gold leaf.
Gold leaf also comes in two forms: loose gold leaf and patent gold leaf. Loose leaf means that the gold leaf is interleaved between very thin sheets of rouged tissue paper. This rouged paper has been dusted with ferrous oxide dust, which prevents the leaf from sticking to it. To transfer loose gold leaf, the gilder uses a special brush called a gilder’s tip.
Patent leaf has been pressed onto one side of the tissue paper that separates the individual leaves of gold. With the gold being lightly adhered to the paper, the gilder can easily transfer the gold leaf to the sized application surface.
The gold usually stays stuck to the sheet unless the paper dries out. Too much moisture in the paper is also a problem. High humidity can increase the bond of the gold to the paper, making transfer difficult. To prevent these problems, some gilders store their books of patent leaf in a plastic container in their refrigerator.
“Patent leaf is easy for the beginner to use,” says Joe Balabusczko, who, for much of his career as a union sign painter in Chicago, specialized in gilding. “Patent leaf is no substitute for loose leaf.” Balabusczko explains that you can work much faster with loose leaf. What’s more, you should only use loose leaf for glass gilding and traditional water gilding applications.
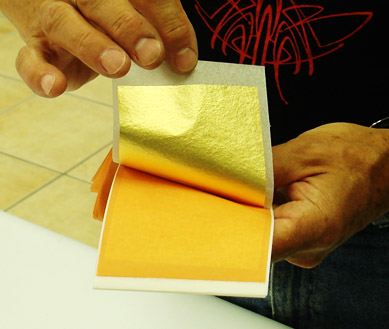
Gold leaf comes in books of 25 sheets. Thin backing paper separates one loose leaf from another. Pictured here is patent leaf, which is gold leaf material that is stuck to the backing paper.
In applying patent golf leaf, rub the backing of the patent leaf gently until the leaf transfers. Do not let the edges of the backing paper touch the sizing. An error such as this might show up in the burnished gold as a dull spot.
Experienced gilders also believe that you can achieve a more brilliant gild with loose leaf. The reason that patent leaf does not produce as glossy of a finish is that the surface of the gold picks up the impression of the paper. Nevertheless, if you haven’t worked with gold leaf before and you are working in a flat, smooth substrate, patent leaf is much easier for the newbie to work with than loose leaf.
Metal Leaf
Of course, all that glitters is not gold. Real gold leaf is not to be confused with imitation gold leaf, which is called Dutch Gold, Schlagmetal or composition leaf. While imitation Dutch gold looks like the real thing, it is really brass, comprised of 85% copper and 15% zinc. The shortcoming of this metal leaf is that it discolors.
Transferring Gold Leaf.
To transfer loose sheets of gold leaf from a book of leaves to the work surface, a gilder uses a very thin flat brush, about three inches wide. Traditionally the gilder will brush the hair of the gilder’s tip over his hair. The brush hairs will pick up some of the oils from the gilder’s hair. This gives the gilder’s tip enough tack to pick up and transfer the sheet of gold leaf.
After the gold leaf is positioned in place, use a squirrel hair mop brush to gently press the leaf into the size. After the gold leaf is applied, use the mop brush to dust away the excess gold particles, called skewings.

With a Squirrel Hair Mop Brush you can tamp gold leaf into an irregular surface.
If you are working with composition leaf, you can use goat hair mop brushes and cosmetic brushes. The reason that you should not use these brushes on real gold is that their hair is much coarser than squirrel hair and can scratch the gold, dulling the gild.
Some gilders will also use cotton to remove excess gold. Be very careful when rubbing the gold with the cotton ball. Although the cotton feels soft, the cotton fibers are coarse enough to scratch the soft gold. The more that you rub the gold with the cotton, the less the gold will shine.
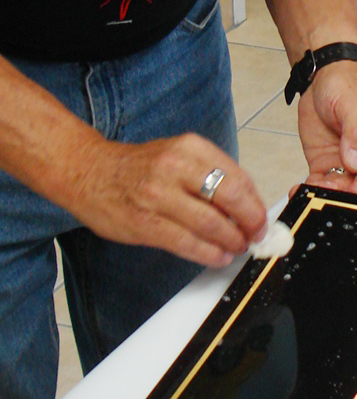
Hospital cotton is much softer than coarser cotton balls and much less likely to scratch the surface of soft gold.
To Clear Coat or Not
For most sign applications, you should not clear coat 23-karat gold leaf. Clear coating diminishes the brilliant surface of gold. The exception to this rule is when the gilded surface is exposed to handling. Gold does not tarnish, but it can be contaminated with body oil and dirt.
If you decide to clear coat your work, Butch Anton’s Frog Juice is always a popular choice. Before using any clear coat, stir the can slowly so you don’t create bubbles in the finish.


