A full wrap is next to impossible to ignore, which makes it an excellent advertising vehicle. When I sold fleet graphics, I always emphasized the advertising value in terms of the cost per thousand of visual impressions. These are terms that marketing and advertising managers and top business executives will understand.
Operated in an urban environment, a full vehicle wrap can generate as many as 11 million impressions per vehicle per year. An over-the-road tractor and trailer rig, traveling on the nation’s interstate highways, typically generates 6 million visual impressions annually. The typical cost per thousand visual impressions ranges between $0.25 and $0.50. That is incredibly cost-effective advertising compared to traditional media such as radio, TV and newspaper advertising.
Vehicle graphics not only cost less than other means of advertising, in many cases, they are more effective. Colorful graphics get noticed and are remembered by viewers. What’s more, an eye-catching vehicle wrap can positively affect the opinions and ultimately the buying decisions of consumers. What also makes vehicle wraps effective as an advertising medium is that the vehicles generally operate in the locale where your customer needs to deliver his message.
Attractive graphics also impact the attitudes of your prospect’s employees. Drivers take more pride and exercise more care when their vehicles decorated with attractive graphics.
Building a successful vehicle wrap business is both an art and a science. In this month’s article, I will cover some of the considerations when entering this market segment.
Survey
Have you ever arrived on a job and the vehicle you are decorating looked nothing like the artboard?
Never quote or agree to do a job sight unseen. Regardless of what type of job you are quoting, you need to visit the site and do a careful inspection to avoid any potential problems and surprises. Armed with the information collected, you can better provide recommendations and accurate pricing to your prospect. In a competitive sales situation, you differentiate yourself as a consultant rather than just another shop that prints vinyl graphics. This distinction can be the deciding factor between getting an order and not getting it.
As you are conducting your survey, take pictures of the different types of vehicles. Record the make and models of the vehicles. If some of the vehicles are currently decorated, note the condition of the graphics. Are any of the graphics lifting, fading or cracking? How has the graphics provider of record handled any of these problems?
In inspecting a prospect’s vehicles, also look for surface damages, such as rust or peeling and chalking paint. These problems must be corrected before applying graphics.
In talking to the prospect’s employees, such as the fleet manager, probe for any dissatisfaction, which you can address when it comes time for you to make your presentation.
You should investigate the frequency of washings, the cleaning chemicals used and the method of washing. These factors affect the appearance and the durability of the graphics. Automatic car washes that utilize bristle brushes can scratch the overlaminate and cause edges to peel. Careless use of pressure washers can also damage graphics.
Design Considerations
After conducting a survey, you need to meet with the prospect and discuss his or her objectives. Before that meeting, learn as much as you can about their company. Discover if the organization is in the process of making new product introductions or changing their corporate identity.
Provide your designer with corporate colors, logos, available photography, typefaces and slogans, along with reprints and information concerning advertising and marketing programs. Learn as much as possible about the prospect’s business, as well as their competitors and industry trends.
Armed with this information, you can begin your design. The primary rule when designing a vehicle wrap is to keep it simple. This rule applies to selecting a background, which should not distract from your primary design elements. The key elements that you should consider are: company name; logo; slogan; pictorial and phone number.
You probably have heard vehicle wraps referred to as rolling billboards. The typical viewing time for a vehicle graphic is often as little as six seconds. During this time, the viewer can only read a few words. For this reason, you should limit the copy on the side of a truck to six words.
The printed word is not so important as the visual image. The design that you create for your customer must stand out from the graphics of their competitors.
Use a typeface that is large and easy to read. And use bright or contrasting colors to attract attention.
In designing the graphics, avoid a many as possible obstructions and compound curves as possible. It’s best to locate text on the flat surfaces of the vehicle sides, hood and truck. If you have to stretch the copy across a flaring front quarter panel or bumper, the lettering will likely become distorted making reading difficult.
In presenting your designs you may should give your prospect options. In addition to presenting the cost for a full vehicle wrap, you may also propose a design and pricing for a partial wrap. That way, if the prospect cannot afford a full wrap, you may at least walk away with an order for the alternative. The key is to close the order as fast as you can so you can close the door on your competitors.
For commercial applications, a well-executed vehicle wrap design will visually express a product or service message to tens of thousands of potential customer’s every day. For a vehicle design to work, it needs to completely embrace and integrate with the shape of the vehicle you are wrapping. It should enhance the lines, shape and contour of all the body surfaces you are wrapping.
Material Selection
A full vehicle wrap is one of the most demanding applications for pressure-sensitive vinyl films. During the installation process, the film is stretched and shrunk as it is applied to smooth, concave and convex surfaces. Because of the requirement of conformability, cast wrap vinyl films and overlaminates are typically specified. As a general rule of thumb, cast vinyl overlaminates should only be used to protect printed cast vinyl films.
Calendered vinyl films, on the other hand, are not designed for application to compound curves. If you use these films for a full wrap, you should not be surprised if the graphics pop off from indentations on the vehicle surface. Calendered films are typically designed for graphic applications to smooth surfaces and simple curves.
Manufacturers of high-quality cast vinyl wrap films include 3M, Avery, Arlon and Oracal.
Each of the companies offers a variety of films, each with its own unique characteristics. In selecting a vehicle wrap vinyl, you should compile and study the product specifications. As important as the technical information is, you should also obtain product samples from your sign supply distributor so you can evaluate vinyl films in printing and graphics application. Listed below are some of the properties to consider when comparing vehicle wrap vinyl films:
● Durability. While most graphics are used on vehicles which are in service for 3 to 5 years, some vehicles can be in use for as long as 7 to 10 years. For this reason, most vehicle wrap films must provide 7 years of durability.
● Handling Characteristics. Vehicle wraps involve handling large sheets of unmasked printed graphics.
For these applications, you will need a film that features a low initial tack adhesive to allow for ease of handling when applying large format graphics. Not only should the ideal film be repositionable, it should also be slideable. In qualifying a film for your needs, you should test a printed sample in a vehicle wrap application.
● Air Egress Liner. For ease of application, a vehicle wrap film should have a bubble-free feature.
● Conformability. A vehicle wrap film must adhere to flat surfaces, compound curves as well as rivets and corrugations. It must also conform to deep cavities.
● Printability. There is only one way to know if a cast vinyl film will satisfy your requirements for printing. Test, Don’t Guess. Get a sample of any film under consideration and print it. Generally, you will want a film with a 90# layflat liner.
● Removability. At some point, applied graphics must be removed. While this feature is rarely discussed with a customer in the sales process, it should not be ignored. An ideal wrap film will provide clean removal from most surfaces for up to 2 to 3 years. For longer applications, it should remove with less than 30% adhesive residue.
● Application Temperature Range. While you should know the temperature range for cold weather applications, the real challenge is hot weather applications. Product specifications only tell you so much. The real test is when you evaluate a candidate product in an actual application.
● Compatible Overlaminate. All printed graphics used for vehicle wraps should be protected with an overlaminate, matched for compatibility with the cast vinyl film that you are using. Providing a compatible laminate is essential for the durability of any vehicle wrap. Not only does the laminate protect the print from the bleaching rays of the sun, it also provides protection from abrasion, cleaning chemicals and gasoline. An overlaminate also gives a graphics panel more body, which makes it easier to handle during installation.
● Print Profiles. In selecting a vehicle wrap vinyl, make sure that profiles are available for your printer. A profile provides your printer with instructions for depositing the right amount of ink on the vinyl film so the printed image looks its best.
Compared to painted graphics vinyl vehicle wraps are less expensive. And easier to remove, if you use the right film. Full wraps also protect the paint system covered by the vinyl, so there’ no telltale ghosting of the image that you get when just using computer cut lettering and symbols.
Tools of the Trade
Some of the application tools which installers have used for truck graphics are not appropriate for vehicle wraps. Some of the old nylon squeegees do not slide smoothly over the surface of an unmasked graphic. For vehicle wraps, felt and Teflon squeegees are tools preferred by many installers.
The slick surface of the Teflon squeegee glides smoothly over the surface of the vinyl without scratching it. The stiff edge of the Teflon squeegee provides great pressure, which helps in pushing out hard winkles and edge puckers.
Felt squeegees are available in a variety of densities and in rectangular and semicircular shapes. Dense felt squeegees with a sharp edge provide the pressure you need when you are stretching a film into an indentation or crease on the side of a vehicle.
Heat gun. In applying vinyl graphics over surfaces with compound curves, indentations, rivets or corrugations, heat is critical to a successful installation. The right amount of heat aids in stretching the vinyl, breaking the memory of the film so it does not shrink back to its original shape. After the film is applied, post-heating ensures that the graphic is secured to the substrate. A professional heat gun is an essential tool in generating a controlled amount of heat up to 400⁰ F specified by the vinyl manufacturer. Heat guns are also much safer than a propane torch so you are less likely to damage a graphic.
Other tools that you should have in your bag of tricks include an air release tool; a tape measure, 1” and 2” masking tape to tack the graphics in place when you are laying out the job; an Olfa knife with the breakaway blades, paper towels, solvent surface cleaner, denatured alcohol or isopropyl alcohol.
3 Step Surface Preparation
Vehicle wraps require that every part of the vehicle which is to be covered with vinyl must be cleaned. This includes the paint at the bottom of the wheel wells, inside the doors and door jamb and all around the gas filler door. Failure to clean the surface properly is a leading cause of adhesion failure.
Surface preparation is a three-step process. First, you need to wash the surface with detergent and water. Even though a washed surface looks clean, contaminants such as waxes, grease, and oils are most likely still present. To remove these contaminants, you need to use a solvent such as DuPont’s 39192 Prep-Sol or a Grease and Wax remover. After you use the solvent surface cleaner, give the surface a final wipe with denatured alcohol or isopropyl alcohol.
This last step should be performed with both hands. In one hand, you will need a rag saturated with alcohol. In your other hand, you will need a clean rag or paper toweling. After you wipe the solvent on, wipe it dry before it evaporates.
TEST DON’T GUESS. Now for a word of caution. To ensure that you use don’t damage a paint system of a car or truck, test the solvent on an inconspicuous area of the vehicle before using it.
Vehicle Wrap Procedure
In planning a graphics program for a prospect, you need to know where the vehicles are domiciled. For national and regional programs trucks could be located in several locations. Find out if indoor facilities are available at each location. When will the vehicles be available for installation? If the vehicles are leased, the leasing company will probably have a service facility which they can make available. Many of these facilities are available around the clock. Let your prospect know that to wrap a van typically takes a two-man team 8 hours to complete.
An indoor facility is critical in installing a full vehicle wrap. It is difficult enough for most people to handle large graphics panels, without having to contend with the wind catching hold of a sheet of film. High temperatures can also make the adhesive system of a graphic most aggressive and more difficult to install.
A clean, temperature-controlled indoor facility provides an ideal installation environment. High summertime temperatures can cause cast vinyl graphics to stretch. This can result in a number of problems, such as misalignment of graphics panels.
What makes a vehicle wrap challenging is that you have to deal with many obstructions such as hinges, gas filler doors and compound curves. Many installers recommend removing mirrors, lights and any other removable obstructions. If you don’t remove these obstructions, you can waste a lot of time cutting and tucking and wrapping the film. Usually, it’s much more efficient to remove these obstructions, apply the film and replace the parts. Be sure to keep all of the parts in one place so you don’t lose them. If you decide to perform by taking these extra steps, installations are performed in less time and look more professional.
After thoroughly cleaning the vehicle, tape the graphics panels to the vehicle substrate to make sure that all of the sections fit.
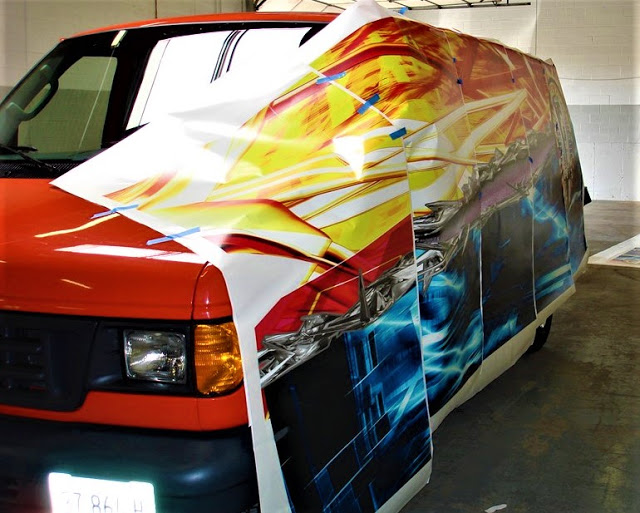
Before you start your application, tape all of the graphic panels in place to make sure that everything fits.
After determining the location of the graphics, remove the release liner from the top six inches of the graphics panel to be applied. On days when you are handling large sections of sticky graphics, you may have wished that God had given you two extra hands. When doing vehicle wraps, you will cut the installation time in less than half by working with a partner. An extra set of hands, can help in holding the graphic away from the application surface preventing pre-adhesion accidents. And a partner can help you in stretching the material to conform around compound curves.
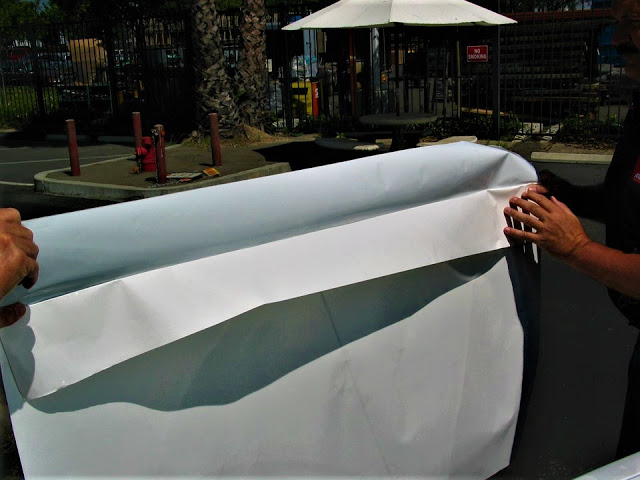
If you are installing a vinyl film with an aggressive adhesive or working outside on a hot day, you need not remove all of the release liner. Instead, only expose the top six inches of the adhesive and tack it in place. Peel back additional liner as needed.
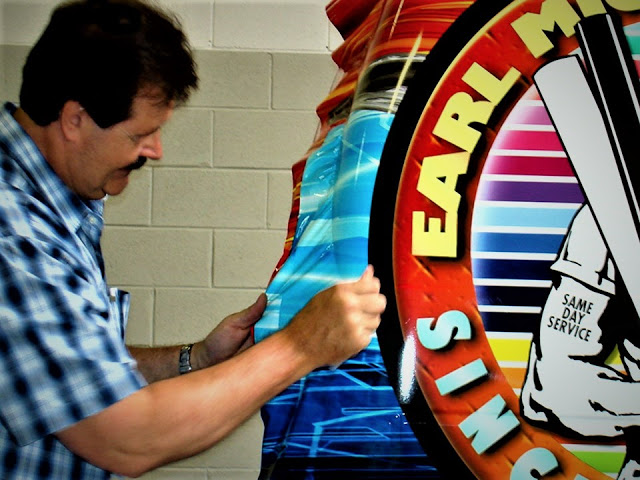
By making an initial horizontal stroke with your squeegee across the marking, tack the graphic into place. Subsequent squeegee strokes across the graphic should overlap on another. The squeegeeing technique used in vehicle wraps is quite different from that used in applying graphics over rivets.
Rather than dragging the squeegee over the graphic, angle it like a snowplow. Holding the squeegee in this manner helps push the air underneath the film away from the point of contact and preventing the air from being trapped as a bubble. Notice that I recommend that you “push” the squeegee, rather than pulling or dragging it over the surface of the film.
While you can remove all of the release liner from a graphics panel, if the film starts to pre-adhere, you can gradually remove the release liner exposing the adhesive. How you handle the film depends on your skill level and the handling characteristics of the film.

Tack a graphics panel in place making a horizontal stroke with your squeegee. Photo courtesy of Arlon Graphics.
Applying a vehicle wrap typically involves stretching the film into concave indentations as well as shrinking the film over the convex surfaces. When applying vinyl to a convex surface, it is not unusual for the material to bunch up as shown in the picture below.
In applying vinyl graphics to a curved surface, the film can bunch up.
Heating the film with an industrial heat gun will cause the vinyl to shrink wrap onto the vehicle substrate. As the film shrinks and tightens up, any of the excess material, which could likely develop into wrinkles, magically vanishes. Shown below.
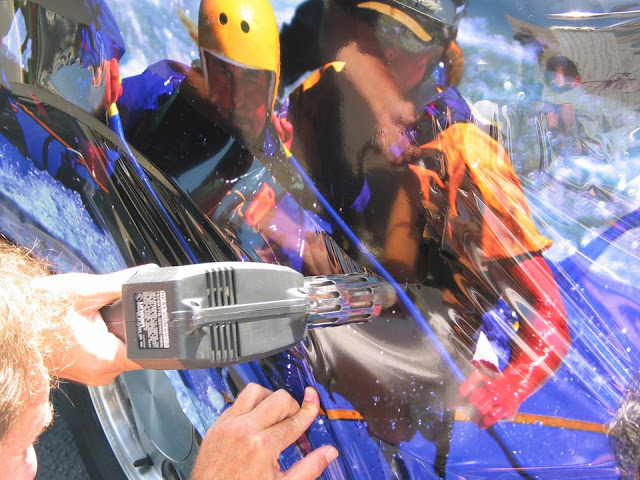
Use a heat gun to shrink wrap the vinyl when needed. Photo courtesy of Arlon Graphics.
As best you can, try to apply the vinyl film in a relaxed state, limiting the amount that you stretch the graphics panel. The photo below shows a panel which was applied in a relaxed state.
Apply vinyl graphics in a relaxed state to avoid overstretching the film. Photo courtesy of Arlon Graphics.
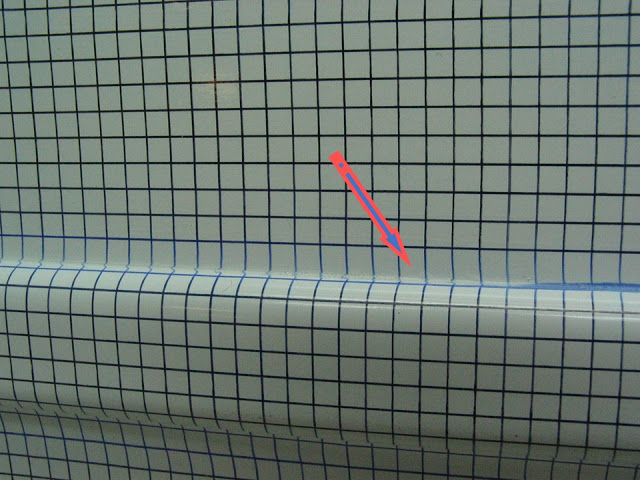
If you stretch the film into an indentation, you reduce the thickness of the film and the thickness of the adhesive. If you stretch a film by 200%, you reduce the thickness of a 2 mil cast vinyl to 1 mil. You also reduce the thickness of 1 mil of adhesive to ½ mil. The photo below shows a panel which was stretched into a channel on the surface of a vehicle.
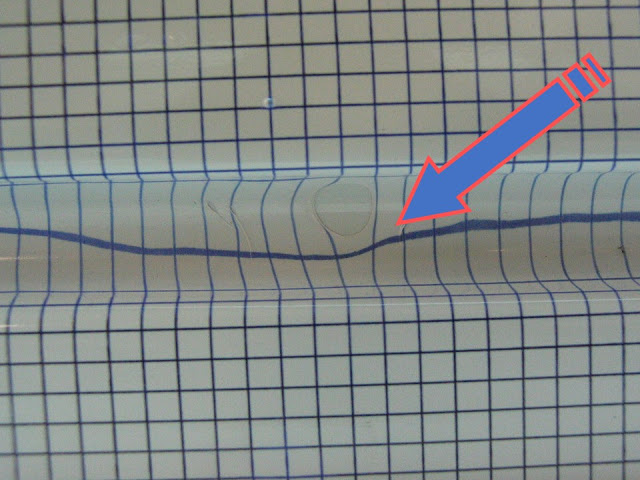
Even a cast vinyl film can only stretch so far. Photo courtesy of Arlon Graphics.
If you stretch a vinyl film, the film tends to stretch back to its original state. As the film lifts from an indentation on the substrate, it become brittle and eventually cracks. See below.

Overstretching a vinyl film can result in product failure down the road.
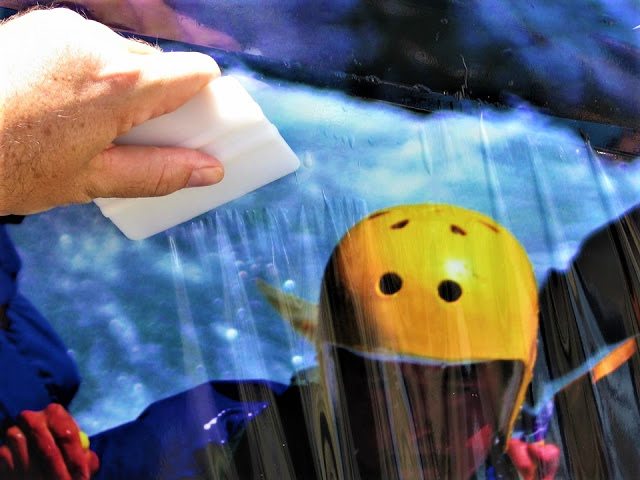
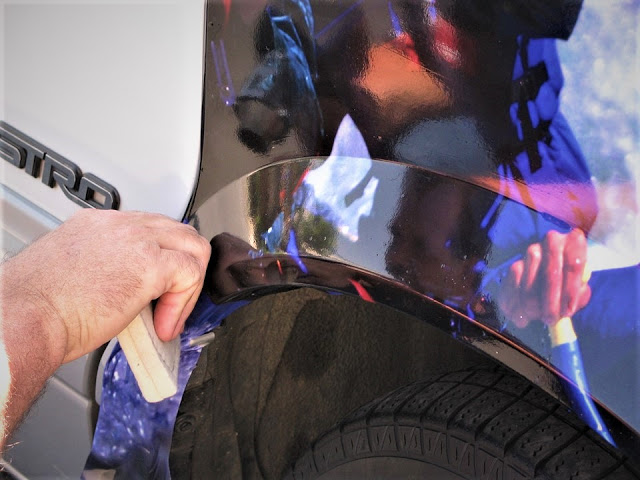
As you burnish the vinyl into the indentation around the wheel well, take short strokes, gradually working the film into the crease. The picture below shows me applying the film using a Teflon squeegee. As you do this, allow a space in the indentation for the air to escape as you put the finishing touches on your work.

Slick Teflon squeegees slide across the surface of an unmasked film. Photo courtesy of Arlon Graphics.
In working the film around irregular surfaces, using a felt squeegee can ensure smoother applications. See the picture below. Felt squeegees, which come in a variety of shapes and densities, are flexible enough to conform to compound curves that you often encounter when doing a vehicle wrap.
Felt squeegee are an indispensable tool when applying graphics to irregular vehicle surfaces. Photo courtesy of Arlon Graphics.
Trimming.
Some vinyl film manufacturers recommend that you trim the graphic flush with the edges of the vehicle. Others believe in wrapping the film around the edges of a door, hood or truck can result in lifting edges. When trimming the film use a sharp knife and extra care so you only cut through the vinyl without cutting into the paint of the vehicle. Cutting too deeply into the painted vehicle surface can result in rust developing.
Conclusion
Applying large format graphics, when wrapping a vehicle, is much different and much more difficult than other types of vinyl applications. Handling large graphics panel can be challenging, even if you are an experienced installer. It’s easy to misalign one panel to another. What’s more, if you’re not careful, you can overstretch or over-stress your graphic films.
If you have never wrapped a vehicle before, either invest in a formal training program or spend some time with someone in the industry, who is willing to teach you some of the tricks of the trade. The time that you invest will give you the skills needed to pursue a lucrative segment of the sign business.


