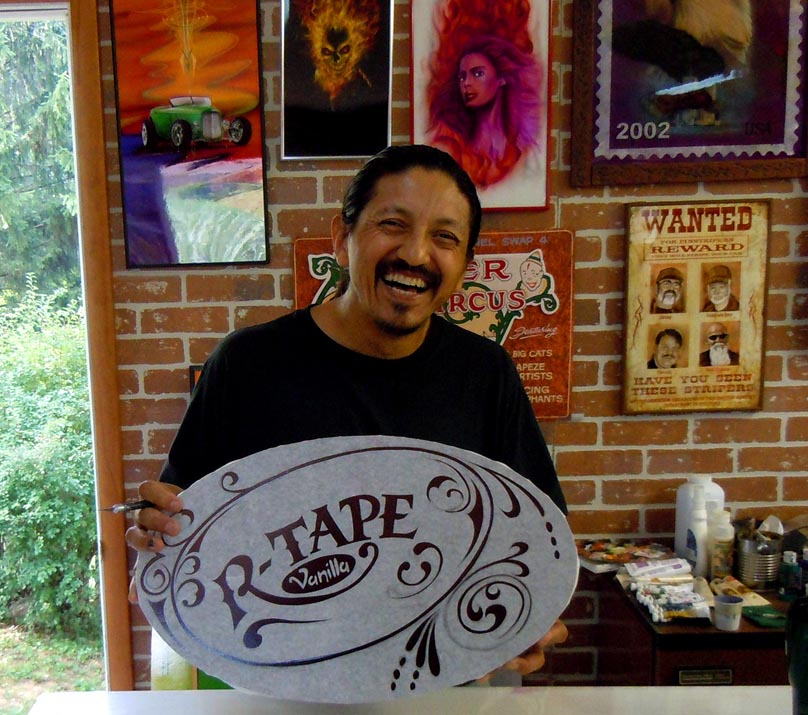
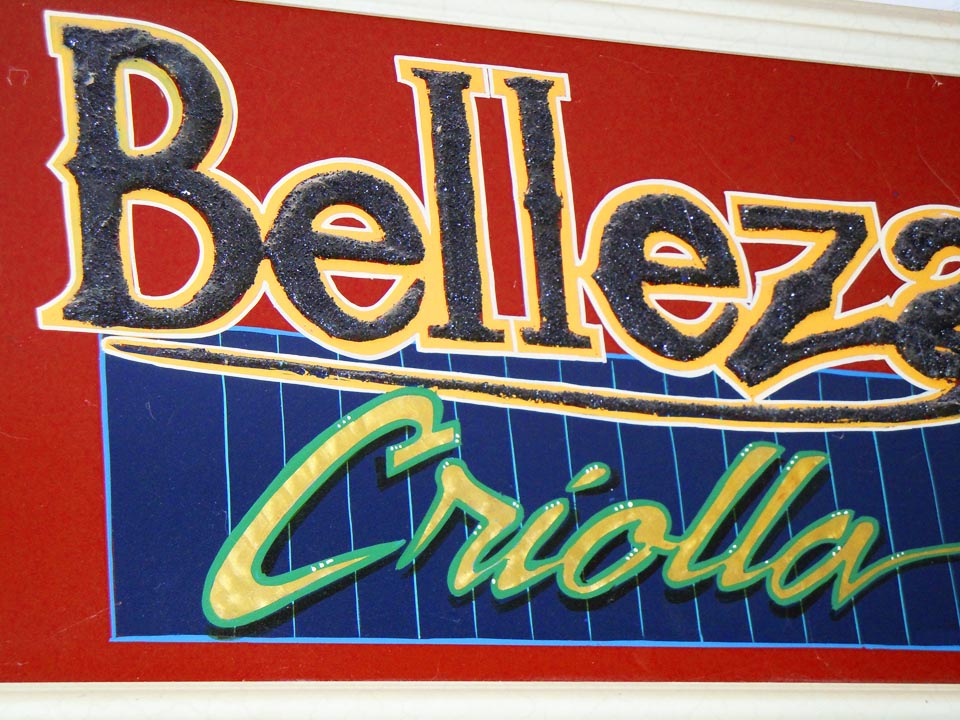
Many in the sign industry, refer to my friend, Sal Cabrera, as the “Gorilla Glue Guy.” Over the years, Sal has perfected his procedures for applying metal leaf directly to tacky and bubbly Gorilla Glue as his adherent, instead of using traditional gold size. His gilding technique is unique and time-saving. In this story, I will explain the steps used to produce the sign pictured below.
Tools Required. Listed below are most important tools and materials that you will need for Gorilla Glue gilding:
- · Detergent and water
- · Isopropyl alcohol (IPA) for surface preparation
- · Gorilla Glue
- · Wax-free Dixie cups
- · RTape 4075 high tack application tape
- · Latex gloves
- · Craft sticks (for mixing the glue)
- · Thin dowel rods (carved to a point, these are great for manipulating the glue after it is applied to the substrate)
- · 2” square pieces of Coroplast corrugated plastic
- · Createx Pure Pigment or Ronan “Real Gold” AquaLeaf
- · Xacto knife with #11 blades
- · Tweezers
- · Variegated gold leaf
- · Acrylic jewels
- · Gilder’s mop brush or cosmetic brush
- · Wash brush or a flat
- · Outliner (brush)
- · Various colors of 1 Shot lettering enamel for outlining
- · Rapid Prep to clean any unwanted glue on the substrate
- · Rapid Remover for cleaning your hands, when you get Gorilla Glue on them
Surface Prep. While Gorilla Glue sticks to just about anything, you still need to clean the substrate as the second step to any project. Otherwise the glue will stick to the surface contaminant instead of the sign surface. For most applications, surface prep consists of washing the substrate with detergent and water. After rinsing with clean water, complete the cleaning process wiping the surface down with isopropyl alcohol.
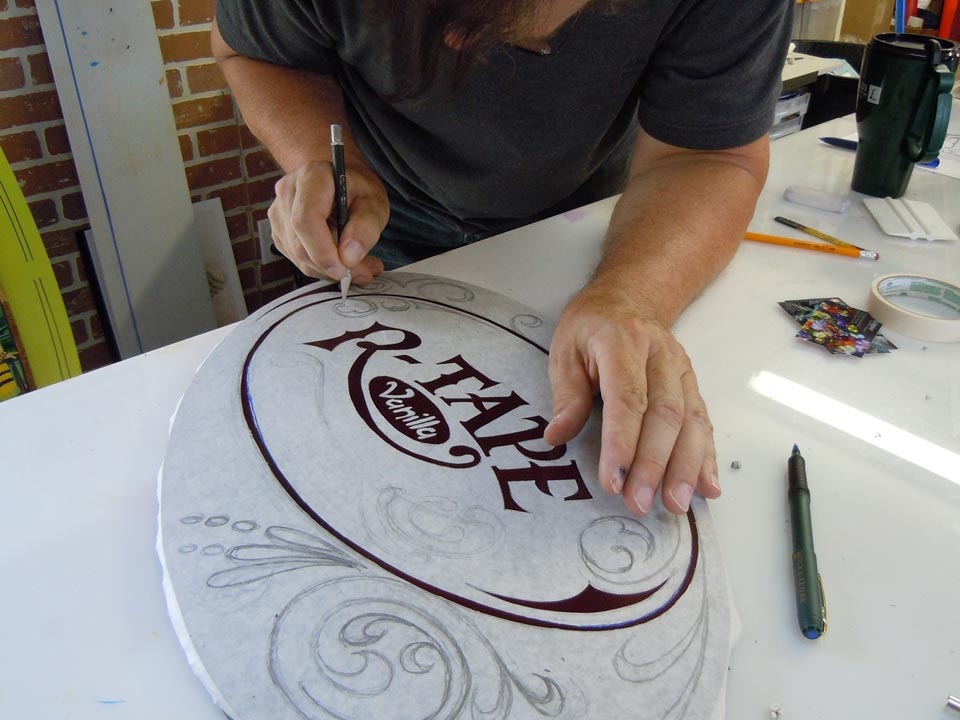
Design. After cleaning a sign blank, Sal applies RTape 4075 high tack application tape to the surface. You can draw your design directly on the tape with a soft pencil. If he needs really clean edges, he also uses vinyl paint mask for a stencil.
Because the glue expands very fast, and cures fast too, you have to work fast. For this reason, Sal plans out how his is going to work, before he begins his project. As part of this planning process, he divides the sign into workable sections. The glue is applied one section at a time.
In preparing his layout, whether he is working with application tape or vinyl paint mask, Sal designs cut lines which divide the masking into workable sections. Cutting vinyl paint mask on the plotter is often preferable to cutting paper application tape masking on the substrate, because it prevents cutting into the paint job.“I usually just apply the application tape directly to the sign, sketch my design on it and then cut away with an Xacto knife and #11 blade,” says Sal. He cautions that you need to use a very delicate touch with this approach, because “you don’t want to press too hard and cut deeply into the painted surface.” He also advises that once you start cutting on a line don’t start and stop. “Otherwise you will end up with a ragged edge,” he says.The photo below shows me cutting the paper application tape masking.
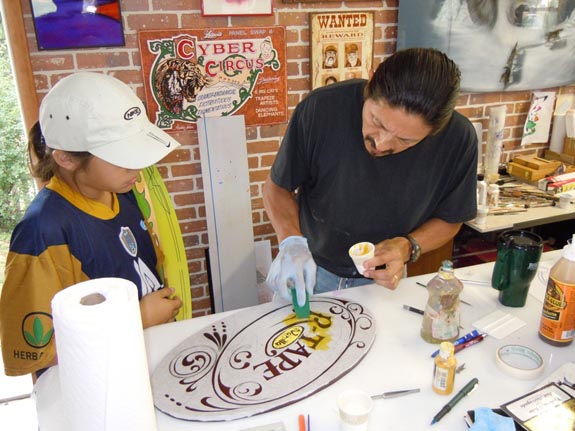
The Mixture. With the application tape masking cut and weeded (see Sal in the photo below), we are ready to apply the glue. For most applications, Sal will pour a small amount of Gorilla Glue in the bottom of a wax-free paper Dixie cup, approximately ¼”. To that he adds two drops of Createx pure pigment (a water-based paint product), which he buys at Bear Air (www.bearair.com) and one or two drops of water and mixes up his concoction with a craft (popsicle) stick.
Mixed with water, the Gorilla Glue begins to foam within a few minutes. By adding Createx pigment Sal controls the amount of foaming. “If you use the pure pigment in the mixture, the glue will set up faster, which means that you have to work faster—a lot faster,” Sal says. “If you don’t add the pigment, you have a little more time to work, but the glue expands more and in some cases it can get out of control.”
Applying the Glue. There are several ways to apply the Gorilla Glue. Sal’s favorite application tool is a small piece of coroplast. Using a piece of coroplast, Sal squeegees the glue over the part of the design that he is working on. The coroplast allows him to apply a consistent layer of glue. If the design involves intricate detail, he only smears on a thin layer of glue. In the picture below, Sal applies the glue as his son, Wesley, looks on.
 Removing the Masking. Immediately after applying the glue, be prepared to remove the masking. If you have any smallpieces of masking in the centers of letters,remove those first. These are very easy to lost track of as the glue expands.
In removing the masking, you will occasionally remove some of the glue over your design. When this happens, you will need to perform some surgery. Sal often uses the tip of an Xacto knife to add a needed droplet of glue. Or he uses the end of a quill handle to apply additional glue. You can also fashion your own tools from thin dowel rods.
Working with the Gorilla Glue is messy work. To keep his hands clean, you will note that Sal wears latex gloves. If you do get the glue on your hands, clean your fingers with a paper towel moistened with water and Rapid Remover.
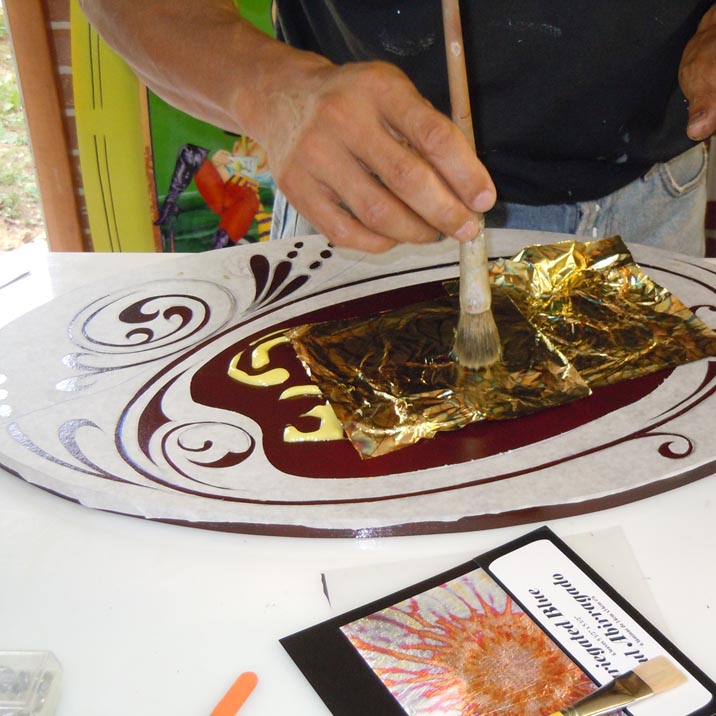
Decorating. In about 10 minutes after the glue is applied and the masking removed, you can apply the metal leaf material. The glue cures quickly and in no time is tacky enough for gilding. At this stage, Sal lays the leaf. Using a either a mop brush or a soft bristle wash brush (shaped like a flat), Sal pushes the variegated leaf into the edges of the design. (See the photo below.) The stiffer wash brush also helps you gently push the expanding glue back into place. Be careful not to touch the curing glue with your brush, or you will likely ruin it.
 After you apply the leaf material, you can press it to tamp down any glue which has expanded more than you like.
Bling, bling. Sal will also embellish his designs pushing acrylic jewels into the curing glue.To precisely position the gems, it helps to havegood tweezers. Sal buys the plastic crystals at craft stores, such as Michaels.
Design idea: Gorilla glue also works great as an adhesive for smalt. In the sign pictured above, Sal has applied black smalt, which is crushed glass enamel, to Gorilla Glue. Available in a variety of colors, smalt can be purchased from Canadian Signcrafter’s Supply (www.signcraftersupply.com) or Letterhead Sign Supply (www.letterheadsignsupply.com).
Applying texture. While the glue is still malleable you can emboss the curing glue with various tools to create different surface textures. The edge of my business card (shown below) works great in creating lines in the gilded glue.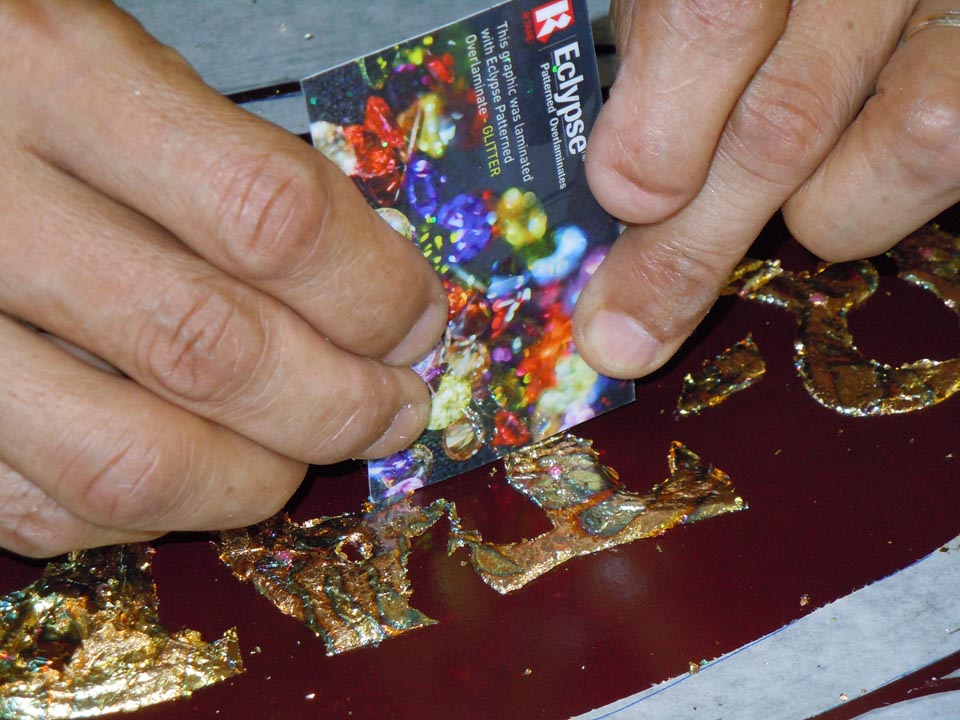 Cleaning up the Sign Panel. In all likelihood, you will end up with glue in places where you don’t want it. To clean up any of his errant artifacts, Sal wipes away the unwanted glue with a mixture of water and Rapid Prep. He will also clean the surface with isopropyl alcohol or straight denatured alcohol for the stubborn areas.
The Finishing Touch. With the Gorilla Glue gilding complete, Sal outlines the design (show below) to clean up the edges. This gives the design a cleaner, more professional look. Selecting a contrasting color will help set the gilded design elements apart from the background.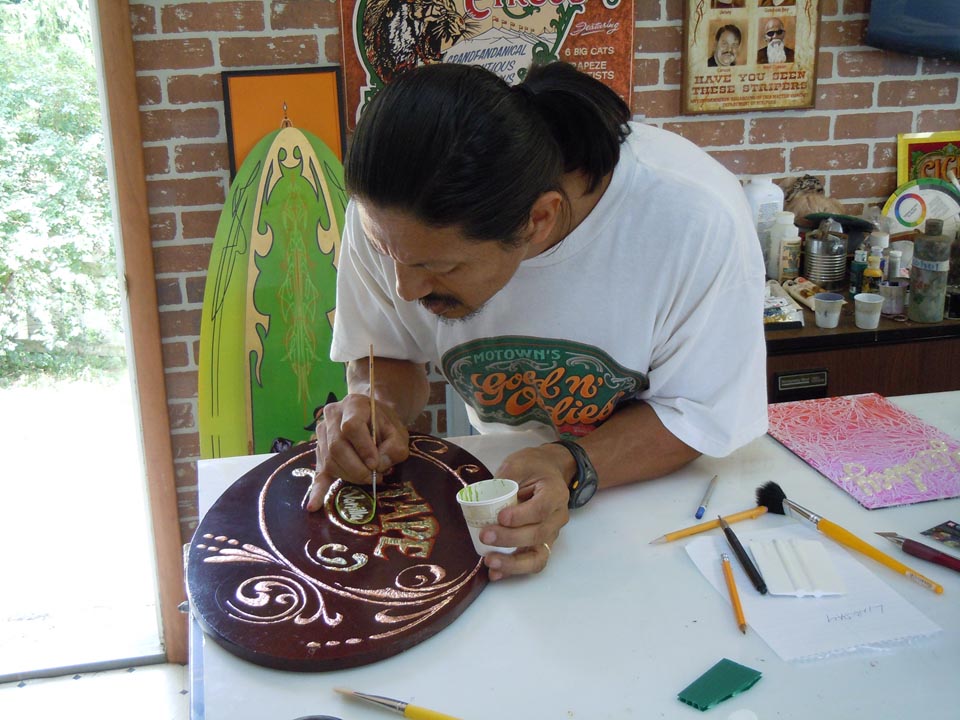 Sal’s Toughest Critic. As an artist, Sal continually critiques his own work. “My wife, Jackie, says that I’m my toughest critic,” he says. “I am never entirely happy with the outcome of a job. When I critique my own work, I always find something that I could have done differently. That’s typical for anyone who is really serious about this business.”
Sal always tries to improve his skills. “There’s nothing wrong with focusing on areas where you need to improve,” says Sal. “The only way to get better is to strengthen those weaknesses. By doing that, you improve and become the best that you can be.”
As seen on hingstssignpost.blogspot.com.


