
In this story Jim Hingst explains the rules for successfully applying vinyl graphics to painted wood.
Edge Preparation for MDO or Plywood Panels.
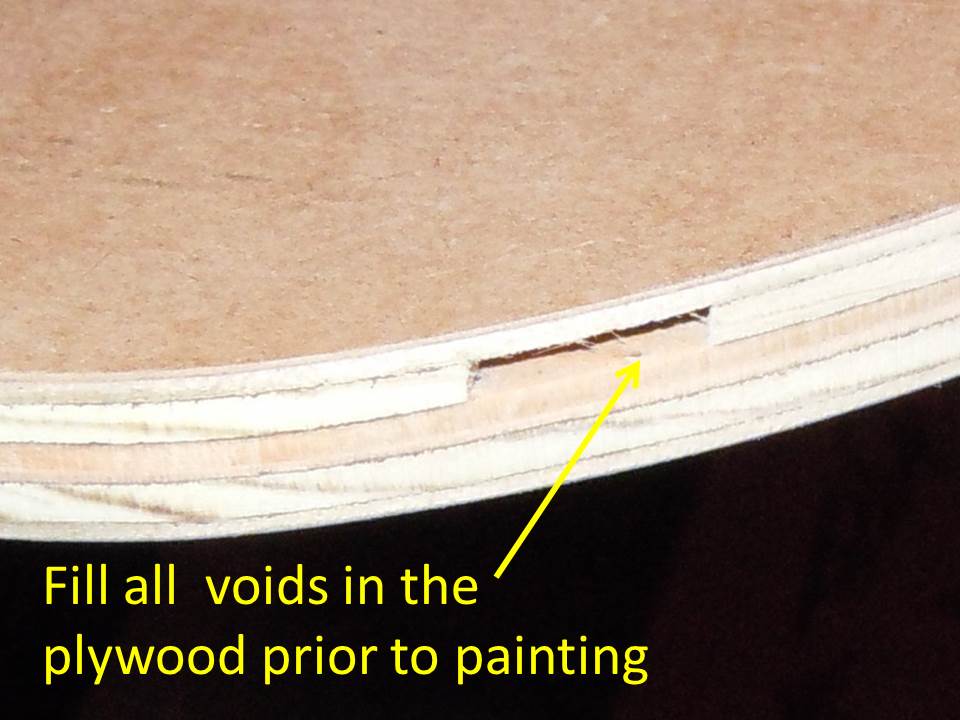
If you are painting MDO or plywood, make sure that any of the voids on the edge of the board are filled and sealed properly. If you don’t, water will seep into the core of the board, causing the sheet to deteriorate. If the edges are not sealed properly, the sheet will absorb moisture, which will lead to paint failure on the surface of the board. Moisture can also cause delamination of the plies.
Prepping Plywood Prior to Painting.
Prior to priming raw plywood, wipe the unpainted surface with a damp rag. This will raise the grain of the wood. Using 150-grit sandpaper, lightly sand the surface of the wood. Then clean the dust off using a tack cloth. Finally, prep the surface with a rag damped with denatured alcohol or isopropyl alcohol.
Prepping an Older Painted Plywood Surface.
If you are painting plywood which has been previously painted, first wash the surface with Trisodium Phosphate (TSP). Rinse per the manufacturer’s instructions. Then, sand the surface with 150-grit sandpaper to give it some tooth for the paint to stick to. After sanding, wipe the surface with a tack rack and then prep the surface with isopropyl alcohol.
Priming the Wood.
Mix the primer well prior to coating the wood. Using a roller, coat the surface of the wood with two thin coats of primer, such as Zinsser oil-based exterior primer. So that the first coat soaks in well into the wood, thin the primer by 10% to 15%. Between coats, lightly scuff the surface with a fine grit sandpaper to provide good intercoat adhesion and to provide the smoothest surface for the vinyl graphics to adhere to.
NOTE: Priming is critical. Primer is not just cheap paint. These coatings are formulated to serve two primary functions. First, the primer seals the wood. It is especially important that you seal the end grain of any wood, because it accounts for the majority of moisture absorption, which can result in paint adhesion failure. The second primary function of primer is to securely anchor the finish coat to the wood.
Painting the Wood.
After allowing the primer to dry for at least six hours, apply two finish coats. In selecting paint for the finish coats, always test the primer and top coat for compatibility or use a paint and primer from the same manufacturer. Always follow the manufacturer’s recommendations regarding surface preparation, ambient temperature, thinning, paint application and drying times.
Paint Selection.
 For finish coats of paint, either a gloss or semi-gloss paint would be my choice. Latex paints can be problematic for several reasons. Matte finish paints contain a matting agent which can inhibit adhesion of a pressure sensitive material. Latex paints are also comprised of large molecules with more space between the molecules. The additional space allows the paint to breathe more, which can also allow for moisture to pass through the coating which can affect adhesion.
Issues with Old Paint.
Older painted surfaces should be carefully inspected prior to vinyl graphics application. Peeling paint is an obvious problem. If the paint is failing, the graphics will fail. Poor intercoat adhesion between the primer and the finish coat is potential problem which is not easy to detect. One way to check for good intercoat adhesion is to perform a simple tape test. Also, check the painted surface for chalking. As paint ages, it oxidizes. The result is that the surface begins to chalk. A chalky surface can contaminate the adhesive and cause adhesion failure.
Curing of the Paint.
Prior to graphics application, the paint must be thoroughly cured. How long it takes for paint to completely cure depends on the paint system, time and temperature. To play it safe, you could follow the installer’s 30 day rule. Waiting one month before applying vinyl graphics, will prevent outgassing problems.
A simple way to check whether the paint is cure is to press your fingernail into the paint. If you dent the surface of the paint with your nail, the paint is not sufficiently cured and the graphics should not be applied.
Vinyl Graphics Application Procedure.
Firm squeegee pressure is important to create a bond to the substrate. Maintaining good squeegee pressure is also critical in forcing air from under the vinyl.
Remove the application tape after final application by pulling it against itself at a 180⁰ angle. After removing the application tape, always re-squeegee the entire graphic, especially the edges and overlaps to prevent edge lifting. To prevent scratching the vinyl film after removing the application tape, use a low-friction sleeve on your squeegee.
Edge sealing and clear coating.
 To protect the graphics after vinyl application, some fabricators will clear coat or edge seal the applique. EDGE SEALING VINYL GRAPHICS THAT ARE APPLIED TO PAINTED WOOD IS RECOMMENDED. Using a fine-tip brush, such as a #6 or #8 quill, paint the edges of the film with a commercial-grade edge sealer.
In clear coating, the coating must be compatible with the vinyl graphics. Some clear coats utilize a very hot solvent, which can penetrate the applied vinyl graphics and attack the adhesive system. Always make sure that you test the clear coat with the vinyl used. NEVER varnish the graphics.


